
You know what PayPal is. And you even use it to receive payments. Being an online payments system, it is one of the best tools for online money transfer for reasons such as:
1. Cost effectiveness: You don’t need to pay any membership fee, processing fee, or even service charges. Paypal is absolutely free to set up
2. Time-saving: Since it is an online payment tool, it helps you receive and send money instantly. Simply specify the recipient and transaction details and you are good to go
3. Contactless exposure: Digital payments do not involve any exchange of cash. And since the COVID-19 pandemic, social distancing is preferred and practiced at large. Thus, digital payments have become a boon
Due to such advantages, you are using PayPal to get payments. This could be for accepting donations or business payments from customers.
Here’s how it works:
A. How does PayPal work
PayPal works just like any other online payment service such as Paytm. You first need to set-up your account and then start making or receiving payments.
1. Set-up your account
Just like any payments app, this is the first step to get started. PayPal allows you to create one personal and one business account.
It also allows you to link multiple emails, debit or credit cards, and bank accounts. But note that each PayPal account needs to have its own email and bank account address.
2. Get started with payments
Once you complete setting up your account, you can get started with payments. It could be to send or receive payments.
Here we will discuss how you can receive payments with PayPal.
To get payments, you need to share your registered email ID with your audience.
That’s all. Pretty simple, right?
Also—you can even transfer the money received in your PayPal wallet to your bank account. To do it, just go to the Transfer Money option present right under your PayPal balance. And go ahead to choose option Transfer To Your Bank.
Though the process is quite simple, there’s a problem. Say you are a seller and wish to accept payments via PayPal.
What will you do here? Tell your PayPal registered email address to each customer individually? No. You’d rather print it and put it at the billing desk.
But here’s another problem. Customers will have to type the entire email address on their phones. And manual typing is obviously prone to errors.
And during peak hours of your business, you cannot open the PayPal app to verify payments all the time.
To minimize the effort for your customers and make payments safer, you can rather use a PayPal QR Code.
B. What is a PayPal QR Code
You already know what a QR Code is. It is a square-shaped 2D barcode that can be easily scanned with a smartphone.
A PayPal QR Code, when scanned, helps end-users make payment to the recipient. That means they do not need to type your email address anymore. A simple scan with the smartphone is all they need to do.

Here’s how you can use a PayPal QR Code for payment:
1. First, you need to get your QR Code
To do it, log in to your PayPal account and download your QR Code. You can also create it using the PayPal Business app
2. Once you have obtained your QR Code, place them at bill counters where customers can easily scan to pay
3. Customers just have to hold their phone up to your QR Code to pay
That’s it. The transaction is complete.
Now, the question is—how do you create a QR Code to receive payments? With a QR Code generator that offers this category, right?
To find one, you can do a quick Google search and you’ll find many such options. You can then go ahead to compare them and choose the best one for your use case.
Or you can simply go through this detailed comparison chart of the Best QR Code generator. And decide which one you would like to go ahead with.
C. How to create a PayPal QR Code
Once you select a QR Code generator, you can go ahead to create your QR Code. In this article, using Scanova for a demo, here’s how you can do it.
There are two ways you can create a PayPal QR Code. These are:
i. If the amount users have to pay is fixed
If the amount to pay is fixed, then you can choose the category of PayPal QR Code from Scanova’s dashboard.
Here are the steps you need to follow:
1. Go to Scanova
2. From QR Code categories, select Paypal QR Code

3. A page will load where you will have to specify the details asked. Start by entering the email address registered with your PayPal account

4. Next, You can also specify an item description and product code (the two of these fields are optional)
5. Now, you will have to specify the amount to be received against every purchase. In addition to this, you can also specify the currency you want to receive payments in
6. Once you specify all these details, click Continue
7. On the page that loads, you’ll have to specify the QR Code image name. Once you’ve specified the name and click Create QR Code
8. Here, you will see the image of your QR Code. Alongside it, you’ll see the Edit Design option
9. If you want to customize your QR Code, then click on this Edit Design option. Once clicked, you will see two QR Code designs on your screen—Custom Logo Design and Custom Background Design
Custom Logo Design: It allows you to add a logo and color to your QR Code. Logo can be an image or a text.
Custom Background Design: It helps you place your QR Code on an image.
You can proceed with either of them.
10. Once your QR Code is ready, say after you design it, click Done Editing followed by clicking on Download. A window will open prompting you to sign-up for a 14-day free trial. Once you’ve signed up, proceed to download your QR Code
11. You’ll be asked to specify the size and format of your QR Code image. Specify these details and click Export
That is all you need to do. Your Paypal QR Code will be downloaded. You can test scan it to see if it is working properly.
ii. If the amount users have to pay is variable
Say you are collecting donations for an NGO project. For this use case, you obviously cannot keep a fixed amount. It depends upon how much the end users want to donate.
For this, you can create your own PayPal Me link from here. With this link, users can pay/donate as much amount as they want to.
You can the encode this link in a Website link QR Code. A Website URL QR Code, when scanned, will redirect end users to the target link.
Here is a step-by-step guide on how to create a Website URL QR Code.
Also, did you know that you can edit your PayPal QR Code for both the use cases mentioned above?
You read it right. You can make changes to the QR Code even after you have created it. Yet your QR Code will remain the same.
This is especially useful if you need to make changes to the amount to be received. Or the PayPal registered email ID. Or want to create a new PayPal me link
D. How to edit the QR Code
This is possible only if you select the Dynamic option in the window pop-up (mentioned in step 7).
A dynamic QR Code can be edited anytime you want. And it even allows you to keep an eye on its scanning activity. That means you can monitor the number of scans, time and date of scans, and many other details.
But if you choose the Static option while creating the QR Code, you will not be able to edit it. This is because static QR Codes are permanent. Once created, they cannot be edited.
To make changes, you will have to create a new QR Code from scratch. Also, static QR Codes are not trackable. Hence, you cannot monitor the scanning activity of a static QR Code.
Now, if you chose the dynamic option and want to edit your PayPal QR Code, here is how you can do it:
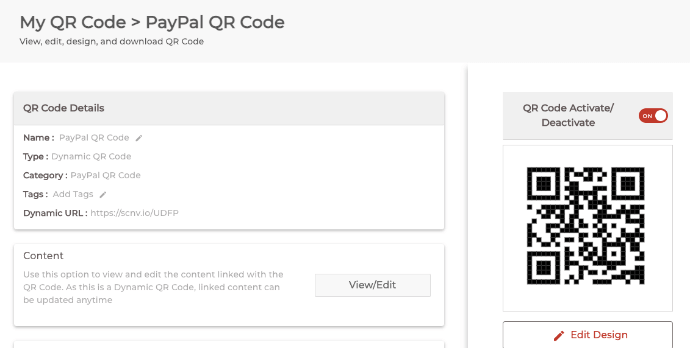
1. Login to your Scanova account and from the Dashboard, click My QR Codes

2. Go to the QR Code you want to make changes to and click View/Edit icon against it
3. On the page that loads, head on to the content section and click View/Edit
4. Here, you can make the required changes
5. Once you make all the changes, click Apply
That’s it. Your QR Code will be updated. You can scan it to confirm if the details have been updated or not.
That’s it. You now know everything about a PayPal QR Code. It helps do away with the need of typing your email address for your customers. And helps you receive payments in a fast, secure, and error-free manner.
The next step? Get started with creating your own Paypal QR Code.
In case you have any questions or concerns, let us know in the comments. We will reach out to you as soon as possible.
Would love to partner up…teaching the world how to #EngageDirectMeasure with #CALL2ACTIONSymbols….doing QR Codes….the RIGHT WAY !
Hello, can I add a QR to my PayPal “donate” button page? I am fundraising for a service dog for my son. I have the donation link from PayPal & would like to add a QR for the flyers I will be printing. Hoping that they will scan the QR & that would take them to the PayPal donation page I have set up. Thank you for your help as I am very new to this technology!!