
You probably are a part of the school/university administration department. And it is your duty to ensure security for the institution and students. One of the ways is to validate students’ entry in the premises.
And to achieve this, you need to issue an identity document to each student. Though the method helps authenticate entries, it is not free of challenges.
It is very easy to duplicate an identity card. There are many softwares available online, which help create fake identity cards.
This practice can allow trespassers and unauthorized entries in the school/college premises. Hence, this puts the school security at risk.
Hence, you are looking for a more secure solution to design student identity cards. In this article we will show you how you can blend technology with identity cards. And make them modern, tech-savvy, sustainable, and secure.
Keep reading.
A. The conventional student identity card
The conventional student ID cards are generally paper-based. They have the student’s contact details along with a photo. These details include the name, grade and section, address and contact details of the parents. All this is either handwritten or printed.
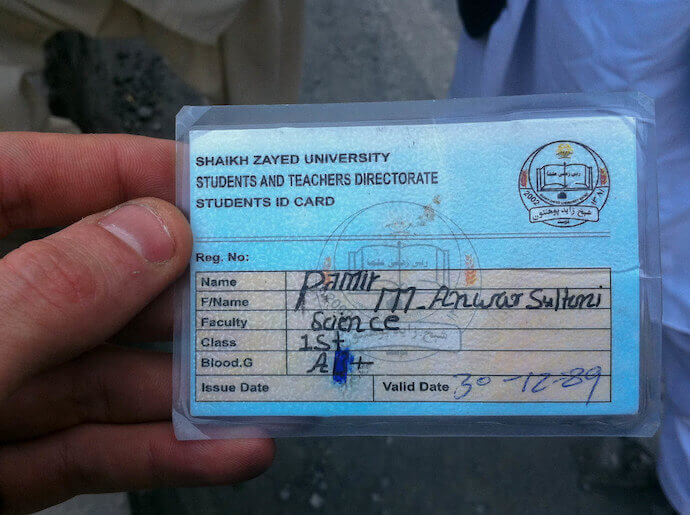
The identity card is then worn on the breakaway lanyard hanging from the neck or clipped to the shirt.
But it’s very easy to remove the original card holder’s photo and put a fake photo. Plus, if the card gets lost/stolen, it is very difficult to track the lost card.
Hence, it is time to optimize these conventional cards. One way to make student identity cards secure is by adding a QR Code to it.
A QR Code is a 2D barcode, which can easily be scanned via a smartphone. In the next section, we will show you how student identity cards with QR Code can help.
B. Why QR Codes
QR codes have become popular today. In fact, they have already ventured into the education sector to make the classroom environment engaging.
In addition, industries such assports, automobiles, engineering, and tourismare using them too.
QR Codes are easy-to-create and not at all capital intensive. They occupy very little space and can easily fit on any top corner of the identity card.
Another quality of QR Codes is that they can resist damage upto 30%. That is, even if the QR Code is subject to slight wear-and-tear, it will still hold its scanning capabilities.
Furthermore, you can also design a QR Code. This means that you can add colors, your school/college logo, or a background image to a QR Code.
For example, say you want to design student identity cards for grade one. And children of this age group love colorful things. Hence, you can use custom-designed QR Codes. They will help make your identity cards look branded to the institution.
Moreover, you can encode different types of information such as text, URL, and contact details in a QR Code.
In the next section, we will detail upon how each category can be used on a QR Code-based identity card.
C. QR Code-based identity card
A QR Code-based identity card has a QR Code printed on it. When scanned, you can see the contact details of the required student.

Here are different categories of QR Codes:
1. Website URL QR Code
In this type of QR Code, you can link a webpage. This webpage will contain all verified details of the student. When scanned, school authorities will view the encoded content. And here, they can manually verify the information with that of the ID cardholder.
2. Text QR Code
A QR Code can encode 7,089 alphanumeric characters. And the number is sufficient for a use case like yours. Simply encode all the student details into a text QR Code. This could be anything such as name, class and section, address and parent contact number.
For both the use cases mentioned above, the school/college can use a dedicated scanning app in order to pull the student’s information from official records.
This way, you will be strictly able to verify identities. And the minimal chance of a duplicate QR Code will also eliminate.
Therefore, you can choose from any of the above categories. Once selected, create a unique QR Code with the relevant information. And then print it on each one.
In the next section, we will detail on how to create QR Codes.
D. How to create QR Codes
1. Using a bulk QR Code generator
Your use case demands you to create QR Codes in bulk. Hence, you need a bulk QR Code generator tool.
In this article, we will use QR Batch for demo purposes. But before you go ahead to create QR Codes, here’s what you need to do:
1. Be clear with the QR Code category you want to choose. As mentioned, the category will depend on the type of content you want to encode.
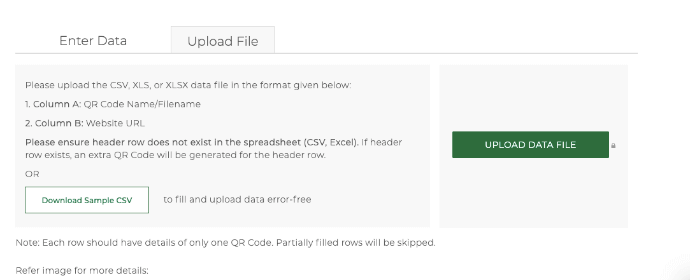
2. Create a spreadsheet in XLS, CSV, and XLSX format. This spreadsheet will need to contain the data, which will be encoded in each QR Code. One row of data for each QR Code. And for this, you need to follow a format.
The first column should have QR Code filename. The QR Codes images that will be generated in the zip folder will have these filenames. Second column onwards, there will be content that needs to be encoded in QR Codes.
For example, say you choose the category of Website URL Code. The first column of the spreadsheet should be something like QR Code 1, QR Code 2, and so on. And the second column should be the website URL.
Once done, you can now proceed to create student identity cards with QR Code in bulk. These are the steps, which you need to follow:
a. Create an account
Go to QR Batch. Here, sign up for an account in order to start creating QR Codes. Note that you sign up for free and there is no subscription required. You pay as you create.
b. Upload spreadsheet
Now, select the category of QR Code according to the content you want to encode. Once done, upload the spreadsheet you created on the page you land.
c. Review data
You will now need to match the data in columns and data to be encoded in QR Codes. That is, it will ask you which column is filename, which one is name, etc. Simply select the field name from the drop-down option and click Confirm for each field.
Once you review the data, proceed to the next step.
d. Add design
Now you can add design by choosing from either of the options:
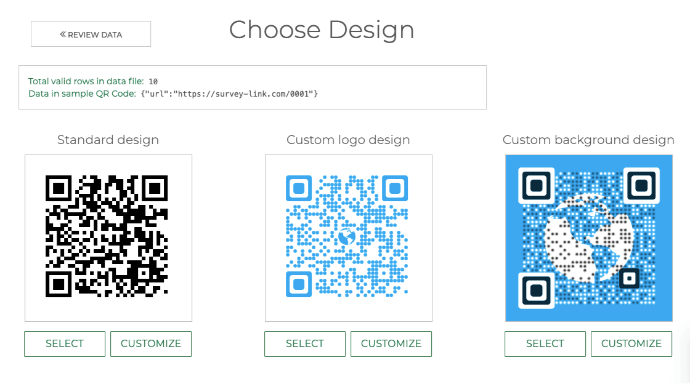
- Standard design: It gives generic black-and-white QR Codes
- Custom Logo Design: It allows you to add a logo and color to your QR Codes
- Custom Background Design: In this option, you can add a background image to a QR code
Once your QR Code design is ready, say after customisation, click Select Design under the QR Code image.
e. Specify QR Code details
As you proceed, a pop-up will appear prompting you to enter details such as Batch name. In the same window, choose the export option as QR Code image and specify the image size and format.
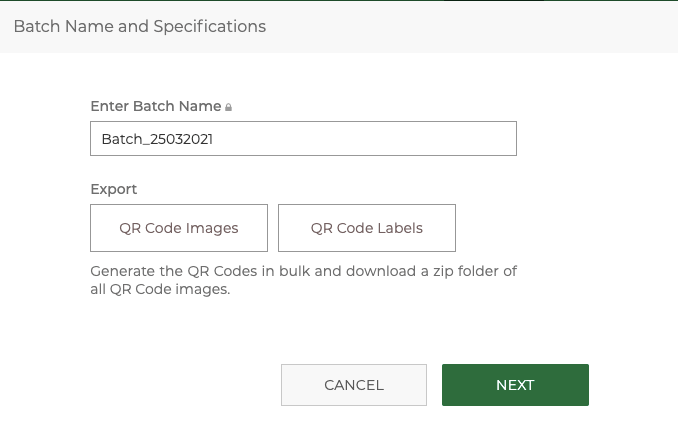
Once done click on Save.
f. Make payment
As you proceed to make payment, you will now be able to see the preview for one of the QR Codes. Besides, you will see other details such as batch name and the price to be paid.
Scan this QR Code with a QR Code scanning app on your smartphone to know if this is the QR Code you wanted. If everything looks fine, proceed to make a payment.
Plus, to get an estimate of what you’ll be charged, you can also use QR Batch price calculator.
g. Download your QR Code batch
Once you make the payment, your QR Code batch will be generated typically in a few minutes. The time taken depends upon the size of the batch. For example, if the number of QR Codes is high (in thousands) it can also take a few hours.
Once the batch is ready, you can download it from the Download Batch section of the app. You will even receive notification via email once your batch is ready. Besides, you can check the progress of your batch on the floating notification icon on your dashboard.
Now, download the zip folder and test QR Codes before printing.
That’s it. Your batch of unique QR Codes will be ready to print.
2. QR Code API
The second way is by integrating your information system with QR Code generation using QR Code API.
It allows you to generate QR Codes programmatically in real-time within your system. Hence, you won’t need any additional software or tools to create the QR Codes manually.
This is all you need to know about student identity cards with QR Code. Like on business cards, or employee identity cards, QR Codes can help validate cardholder’s credentials with minimal chance of duplication.
So, create QR Codes for student identity cards now to secure school/college premises.
Create QR Codes for Identity Cards

Excellent beat ! I wish to apprentice while you amend your site, how can i subscribe for a weblog site?
Hey There,
We are glad you liked our blogs. You can subscribe to our blogs by clicking on the push notification alert on our blog page and stay tuned for more such blogs.