You know what QR Codes are and how to create one. You have probably noticed a QR Code remains scanable despite dirt or damage.
You might have also seen many QR Codes with logos. Despite damage or wear and tear, the QR Code scans perfectly fine. This is because of the QR Code error correction feature.
In this article, we’ll cover everything there is to know about QR Code error correction levels and QR Code algorithms.
But first, let’s find the answer to the question, “What is QR Code error correction?”
Let’s begin!
A. What is QR Code error correction?

QR Code error correction refers to the ability of the QR Code to sustain damage or distortion and still be readable.
QR Codes have built-in error correction capabilities to ensure that even if the code is partially obscured, damaged, or distorted, it can still be decoded accurately.
Fun Fact: QR Code error correction is inspired by concepts used in deep space communication! Like QR Codes need to survive potential damage during transmission, deep space probes rely on error correction to ensure data integrity across vast distances.
QR Codes use a Reed-Solomon error correction algorithm, which adds redundant information to the encoded data.
This redundant or repetitive information allows the QR Code reader to reconstruct the original data even if parts of the code are damaged or unreadable.
Fun Fact: Reed-Solomon codes, developed in the 1960s, are also employed in data storage devices like CDs and DVDs to protect against scratches and errors.
When a QR Code is generated, the QR Code correction level can be specified.
The error correction level determines the amount of redundant information added to the QR Code.
B. How does QR Code error correction work?
1. Understanding the concept
Error correction happens when the Reed-Solomon Code is implemented. In a nutshell, it adds backup data to the QR Code mathematically.
Think of a QR Code as a secret message written in a special code. The code itself is a black-and-white pattern, but it holds information like a website address or a phone number.
The problem is if the code gets smudged or ripped, it might be hard to read the whole message.
This is exactly where error correction comes in:
Think of it like a built-in backup plan. When the QR Code is created, some extra information gets added along with the main message. This extra info acts like spare parts.
If some part of the QR Code gets damaged, the spare parts kick in. The QR Code reader, through smart QR Code algorithms, can use them to determine the missing piece and rebuild the message.
It’s like having a friend who knows the secret code, too. They can look at the damaged message and use the spare parts to guess the missing bits.
So, error correction helps ensure the QR Code reader can still understand the message, even if the code is a little messed up. It’s like having a safety net to ensure the information gets through!
Error correction happens when the Reed-Solomon Code is implemented. In a nutshell, it adds backup data to the QR Code mathematically.

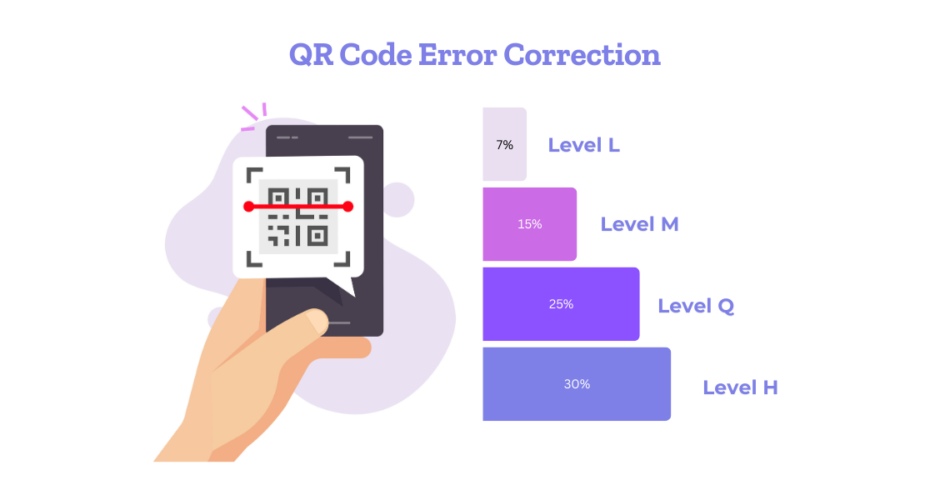
There are four levels of error correction:
1. Level L: up to 7% error correction capability
2. Level M: up to 15% error correction capability
3. Level Q: up to 25% error correction capability
4. Level H: up to 30% error correction capability
Raising the level of error correction code improves error correction. However, one must consider that it also makes the QR Code dense.
Did you know a QR Code can lose up to 30% of its data and still be perfectly readable with high error correction? That’s like a crumpled-up message magically unfolding itself!
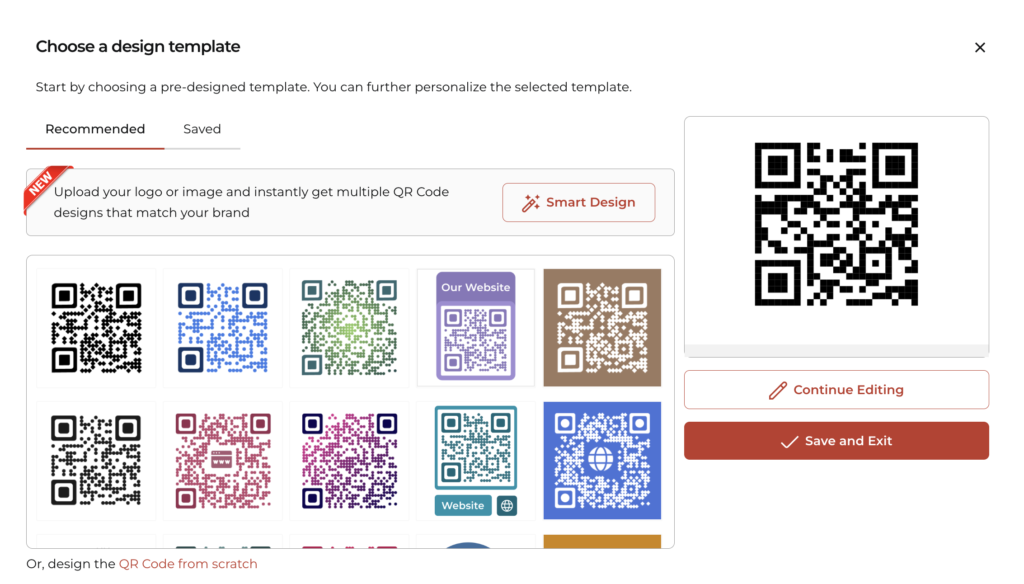
Few online QR Code generators, such as Scanova, allow users to choose the error correction level while creating a QR Code. Check if your QR Code Generator has this feature.
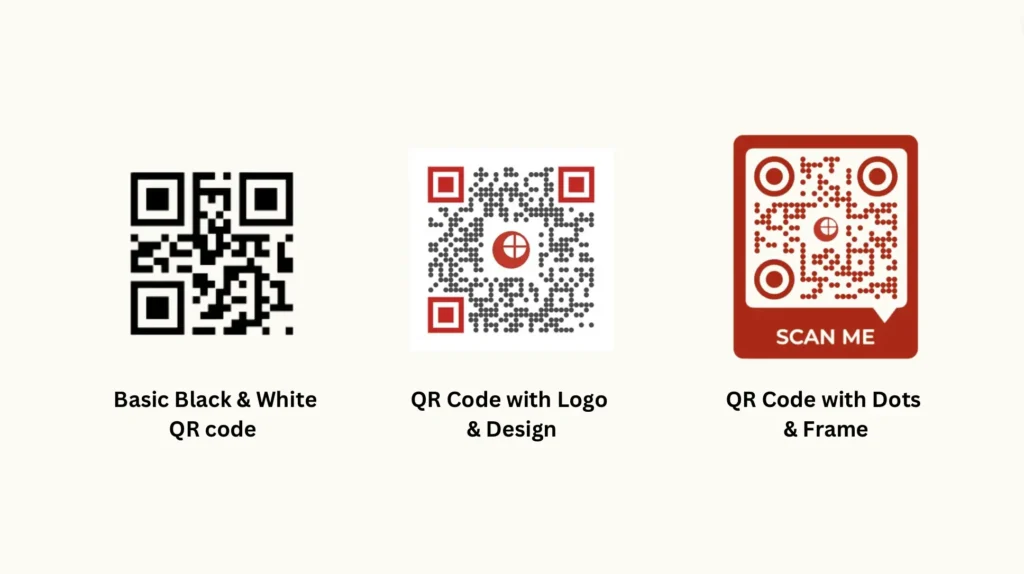
Besides making the QR Code scannable, error correction creates room for creativity. It is an error correction that allows you to add a logo to your QR Codes.
Removing some data from the QR Code introduces an error. Then, the logo is added. Hence, one should always choose a higher error correction level when creating a QR Code with a logo.
2. Do higher QR error correction levels lead to slower scans?
Yes and No. Let’s understand this more clearly: higher error correction levels can slow down scanning because there’s more redundant information embedded in the QR Code, which means there’s more data to process during decoding.
Fun Fact: QR Code Error correction doesn’t just improve readability; it also speeds up the scanning process. Since the scanner doesn’t need extra time to decipher a damaged code, a well-protected QR Code scans nicely and fast.
However, in practice, the difference in scanning time between different error correction levels might not be noticeable for typical QR Code usage scenarios.
The scanning speed depends on various factors, such as the quality of the camera, the processing power of the device running the QR Code scanning application, and environmental conditions.
In some cases, the scanning speed might be affected by factors unrelated to error correction, such as the complexity of the QR Code’s data or other visual distractions.
3. How does a high QR Code error correction level affect dynamic QR Codes?
Dynamic QR Codes are QR Codes that can be edited or updated after they have been created and distributed.
This means that the data encoded within them can be changed without creating a new QR Code.
Regarding dynamic QR codes, the choice of QR Code error correction level can affect how effectively the code can be modified without losing readability.
Here’s how a high QR Code error correction level can affect dynamic QR Codes:
1. Flexibility in data modification: Higher QR Code error correction levels provide greater redundancy in the encoded data, which means the QR code can sustain more alterations without becoming unreadable.
This flexibility allows for more extensive modifications to the data encoded within the QR Code without compromising its integrity.
2. Resilience to data updates: Dynamic QR Codes often encode data that may change frequently, such as URLs or product information.
With higher QR Code correction levels, the QR Code can still be scanned accurately even after multiple updates to the encoded data.
This resilience ensures the QR Code remains functional, even as its content changes.
3. Readability after modifications: When data is updated in a dynamic QR Code, the layout or structure of the encoded data may change.
Higher QR Code error correction levels help ensure that the QR Code remains readable even if the updated data results in minor distortions or disruptions to the code’s pattern.
A high error correction level in dynamic QR Codes provides greater flexibility and resilience, allowing for more frequent updates to the encoded data without sacrificing readability or functionality.
However, it’s essential to strike a balance between the QR Code error correction level and the size of the QR Code, as higher error correction levels can also result in larger QR Codes, which may not always be desirable, particularly in space-constrained applications.
Pro Tip: While QR Codes are known for their error correction capabilities, it’s still important to use them responsibly. Avoid placing them on uneven surfaces or using very small sizes, as this can make them difficult to scan, even with error correction.
C. How to decide the level of QR Code error correction?

Factors such as operating environment and QR Code size are important determinants of error correction level.
- In an environmental setup, such as industries where QR Codes may get dirty, Level Q or H works best. It will help to maintain scannability despite wear and tear.
- For general marketing purposes, Levels L and M of QR Code error correction are suitable
Higher levels are also recommended as one decides to go ahead and get a QR Code tattooed. This is because the higher the QR Code error correction level, the greater the data modules and, thus, the greater the scannability.
Since QR Codes are easy to create and use and are of diverse types, their popularity is soaring daily. The more you learn how to design a QR Code, the better your QR Code performs.
Now, let’s discuss how to create one.

D. How to create a QR Code with error correction?
Now comes the actual question: How do you create a QR Code with error correction?

1. Find a suitable QR Code generator!
First, you’d need to find a QR Code generator that offers you the error correction feature. A simple Google search will fetch you many options to choose from.
However, going through each result to find the best one is tedious. To make it easier, here is a detailed comparison of the best QR Code generator available online. You can find the best one for yourself.
Imagine you’re creating a secret message, but instead of words, it’s a QR Code! The problem? The message might be garbled if the code gets a smudge or a tear.
This is where Scanova shines. We don’t just generate QR Codes; we make them resilient and visually stunning.
Here’s why Scanova is the perfect tool for your QR Code campaign:
1. Error Correction: Built-in backup for your message!
Think of error correction as a safety net for your QR Code. Even if it gets a little damaged, Scanova’s codes have extra information embedded that helps smartphones rebuild the message and understand it perfectly.
2. Design Freedom: Make your code stand out!
First impressions matter, and a bland QR Code might get ignored. With Scanova, you can ditch boring black-and-white squares and add your logo, brand colors, or a call to action to your QR Code.
This will make your QR Code pop and grab attention, and at the same time, you can make it more resilient with our error correction features.

3. Security you can trust: Keeping your data safe!
QR Codes can hold sensitive information like contact details or login credentials. Scanova takes data privacy very seriously.
To protect your information, it adheres to strict compliances like GDPR, SOC 2, and ISO 27001: 2022.

4. Free and paid options: Find your perfect fit
Scanova offers a free QR Code generator for basic needs. But for advanced features like error correction, design customization, and analytics tracking, their paid plans have you covered.
5. Easy to use: No tech headaches here!
Creating a QR Code with Scanova is a breeze. The user-friendly interface makes it simple for anyone, regardless of tech experience, to generate secure and effective QR Codes.
Pro Tip: Don’t settle for a basic QR Code generator. Choose Scanova and create QR Codes that are both smart and stylish. Visit Scanova today and see the difference!
2. Create an error correction QR Code
Using the Scanova QR Code generator, here’s how you can do it:
I. Go to Scanova.
II. On the page that loads, select the most relevant QR Code category for your use case.
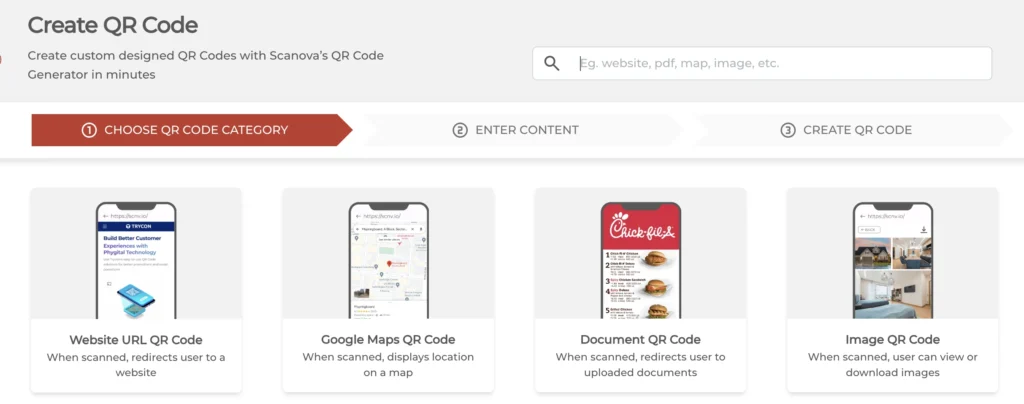
III. Add the content you want to encode and click Continue.
IV. Next, name your QR Code and click Create QR Code.
V. On the page that loads next, you will see the image of the QR Code. You’ll also see the Edit Design option underneath it.
VI. Click on the Edit Design option if you want to change the look of your QR Code.
3. Custom logo design (optional)
VII. Once you click on Edit Design, you’ll find various design options. Here, you can customize the QR Code design as you wish and select the desired error correction level.
VIII. Go to the Error Correction tab and select the level of QR Code error correction for your QR Code.
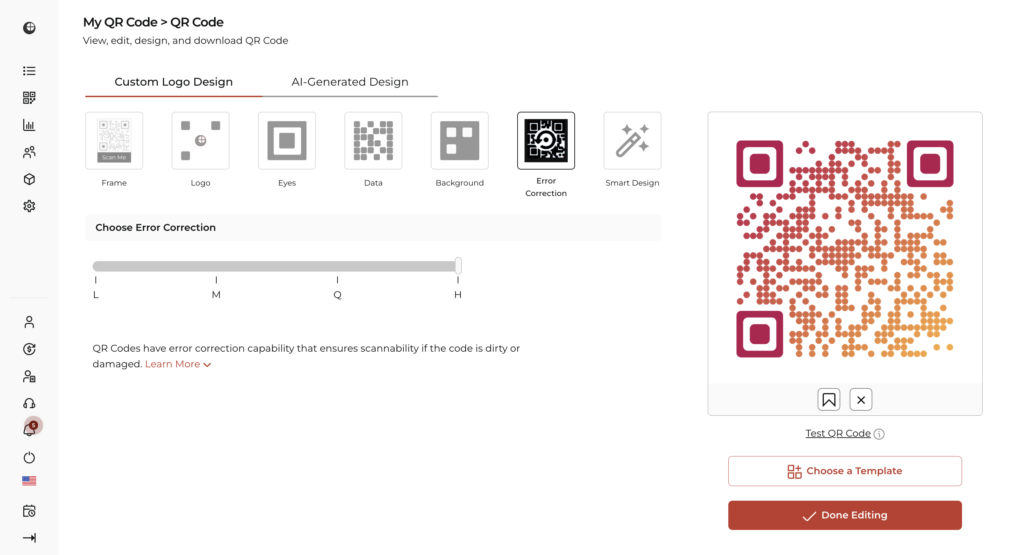
Note that if you have added a logo, an appropriate level of error correction will be chosen automatically to ensure good scannability.
IX. Once you finalize the QR Code design, click Done Editing. Go ahead to Download your QR Code. A pop-up will appear, prompting you to sign up for a 14-day free trial.
X. Once you sign up, proceed to download your QR Code. Now, you must specify the size and format of the QR Code image to be downloaded. Once you enter these details, click Export.
Your QR Code with error correction will be downloaded. You should download the image in vector format (SVG, EPS) if you want to add your QR Code to print material.
That’s all you need to know about the QR Code error correction feature.

E. FAQs: QR Code Error Correction

1. Can a damaged QR Code be read?
Yes, in many cases, a damaged QR Code can still be read. QR Codes incorporate error correction techniques, allowing them to withstand damage to some extent.
The level of damage that can be tolerated depends on factors such as the extent of the damage and the error correction level used when generating the QR Code.
2. How does error correction work on QR Codes?
Error correction in QR Codes works by adding redundant information to the encoded data using a Reed-Solomon error correction algorithm.
This redundant information allows the QR Code reader to reconstruct the original data even if parts of the code are damaged or unreadable.
3. what is error correction? What is the error correction rate for QR Codes?
Error correction refers to the self-ability of QR Codes to correct errors and be readable even if parts of the QR get damaged.
The error correction rate for QR Codes varies depending on the error correction level chosen during QR Code generation.
There are four QR Code error correction levels: L (Low), M (Medium), Q (Quartile), and H (High), each offering different levels of error correction ranging from around 7% to 30% of codewords that can be restored.
4. How can I repair a damaged QR Code?
Repairing a damaged QR Code can be challenging, but in many cases, simply ensuring that the QR Code is clean and unobstructed can improve readability.
If the damage is significant, using a QR Code scanning application with robust error correction capabilities can help decode the damaged code.
Alternatively, if you have access to the original data encoded in the QR Code, you can regenerate the QR Code with a higher error correction level.
5. What are the four error correction levels of QR Codes? And how to determine the QR Code error correction level?
The four QR Code error correction levels of QR Codes are:
- Level L (Low) – About 7% of codewords can be restored
- Level M (Medium) – About 15% of codewords can be restored
- Level Q (Quartile) – About 25% of codewords can be restored
- Level H (High) – About 30% of codewords can be restored
6. How much damage can a QR Code withstand with error correction?
The error correction level chosen during QR Code generation determines how much damage it can handle.
Higher correction levels can withstand scratches, smudges, and partial code loss.
7. Is there a downside to using high error correction?
While high error correction is ideal for ensuring readability in harsh environments, it can make the QR Code slightly larger and require more data for scanning.
A lower error correction level might suffice for simple applications with unlikely damage.
8. Can a QR Code with high error correction still become unreadable?
In extreme damage (like a large tear or complete code destruction), even high error correction might not be enough to recover the data.
9. How can I ensure my QR Code is scannable?
- Choose an appropriate error correction level based on the potential damage risk.
- Use a high-quality QR Code generator for optimal code structure.
- Print the QR Code on a clear, contrasting background with good lighting.
- Test the scannability of your QR Code before finalizing its use.
10. How do QR Codes error correct?
QR Codes use a smart system called error correction to stay readable, even when they get damaged.
This means that if part of the QR Code is scratched, dirty, or faded, it can still be scanned.
QR Codes are made using a special algorithm called Reed-Solomon error correction.
This algorithm adds extra data to the QR Code. If some parts get lost or damaged, the scanner uses this extra data to rebuild the missing information.
11. How do I fix QR Code error?
If your QR Code isn’t working, don’t worry. There are simple ways to fix it.
First, check the design. Over-customizing a QR Code can block the data patterns. Keep logos small and avoid covering key areas.
Next, increase error correction. Use a higher level (like Q or H) when creating the QR Code. This makes the code more resistant to damage.
Test the QR Code on multiple devices. Some scanners are more sensitive than others. If it works on one but not another, the issue may be with the scanner.
Check the link if the QR Code leads to a webpage. Make sure the URL is correct and still active. A broken link won’t open, even if the QR Code scans fine.
Size matters, too. Ensure the QR Code is at least 2 x 2 cm (0.8 x 0.8 inches) for small prints. Larger codes are easier to scan, especially from a distance.
Finally, use high-quality images when printing. Blurry or pixelated QR Codes are harder to scan. Always test your QR Code before sharing it.
In short, fixing a QR Code error is easy. Keep the design clean, check the link, and test on different devices.
12. What is the error resistance of a QR Code?
QR Codes are surprisingly tough. Thanks to error correction, they can still work even if damaged.
The error resistance depends on the error correction level chosen when creating the code. There are four levels:
- Level L (Low) – Resists up to 7% damage. Works best in clean, safe environments.
- Level M (Medium) – Resists up to 15% damage. It’s the most common and works well for most situations.
- Level Q (Quartile) – Resists up to 25% damage. Ideal for areas where the QR Code may face wear and tear.
- Level H (High) – Resists up to 30% damage. Best for harsh conditions or heavy customization.
For example, if a QR Code has Level H QR Code error correction, nearly one-third of it can be missing or damaged, and it will still scan.
This makes QR Codes reliable even in outdoor spaces, on packages, or on worn-out labels.
Create durable QR Codes with Scanova’s QR Code generator error correction! Ensure your codes stay scannable, no matter the damage or time, with this QR Code generator’s high error correction levels!
Good service – i like it