Feedback QR Code
Create a QR Code for questionnaire or feedback survey with Scanova. Upon scanning the QR Code, user will be shown this feedback questionnaire/survey.
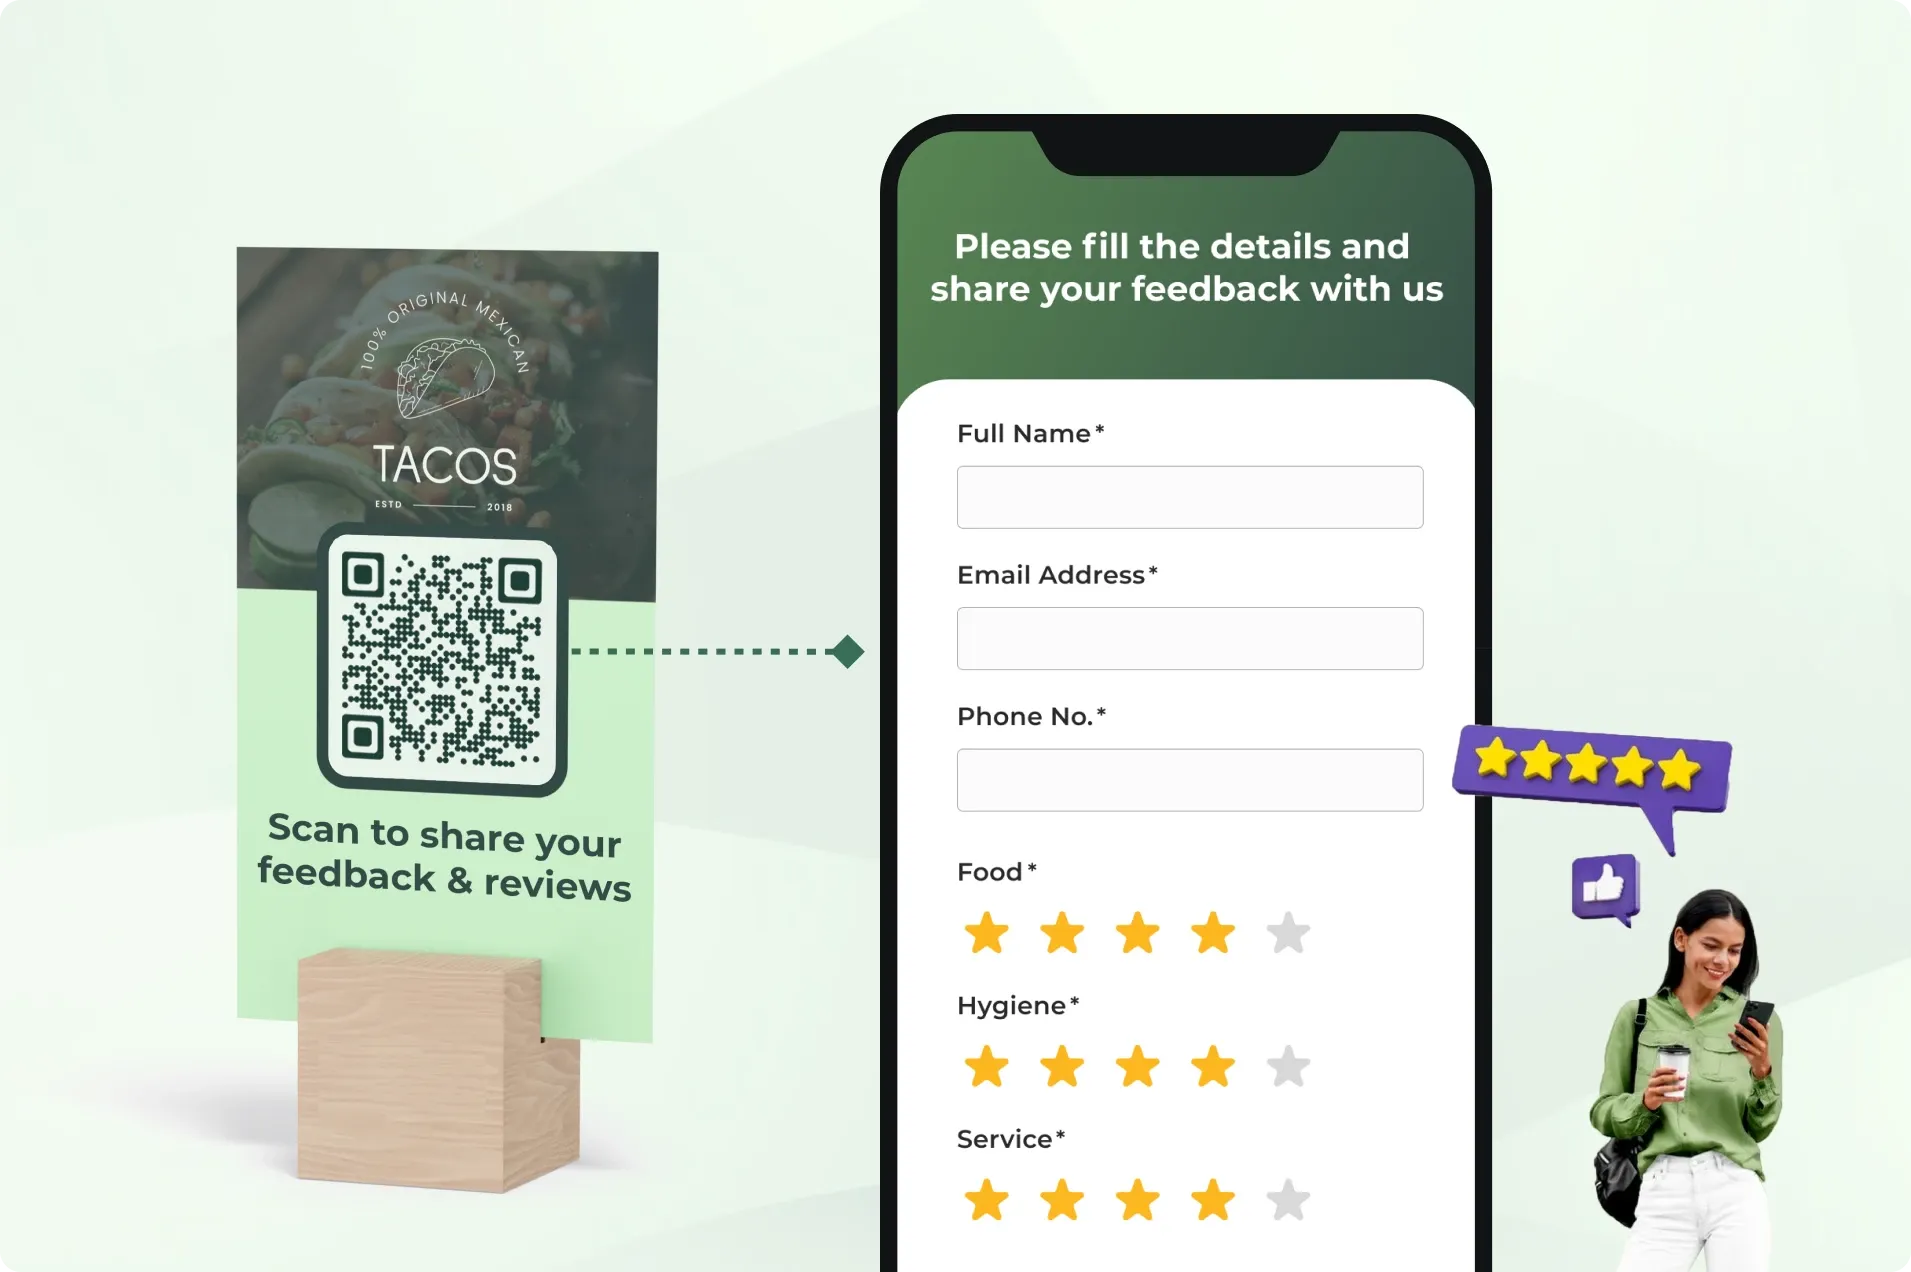
Get instant feedback with minimal effort
Gather valuable insights, enhance engagement, reduce printing costs, and more. By linking surveys or feedback forms to QR Codes, you can quickly collect opinions and preferences from your target audience. This instant feedback helps you understand customer needs and expectations better.
By digitizing the feedback process, you can significantly reduce printing costs and make your approach more eco-friendly.
Collect insights with Scanova’s QR Codes for feedback survey
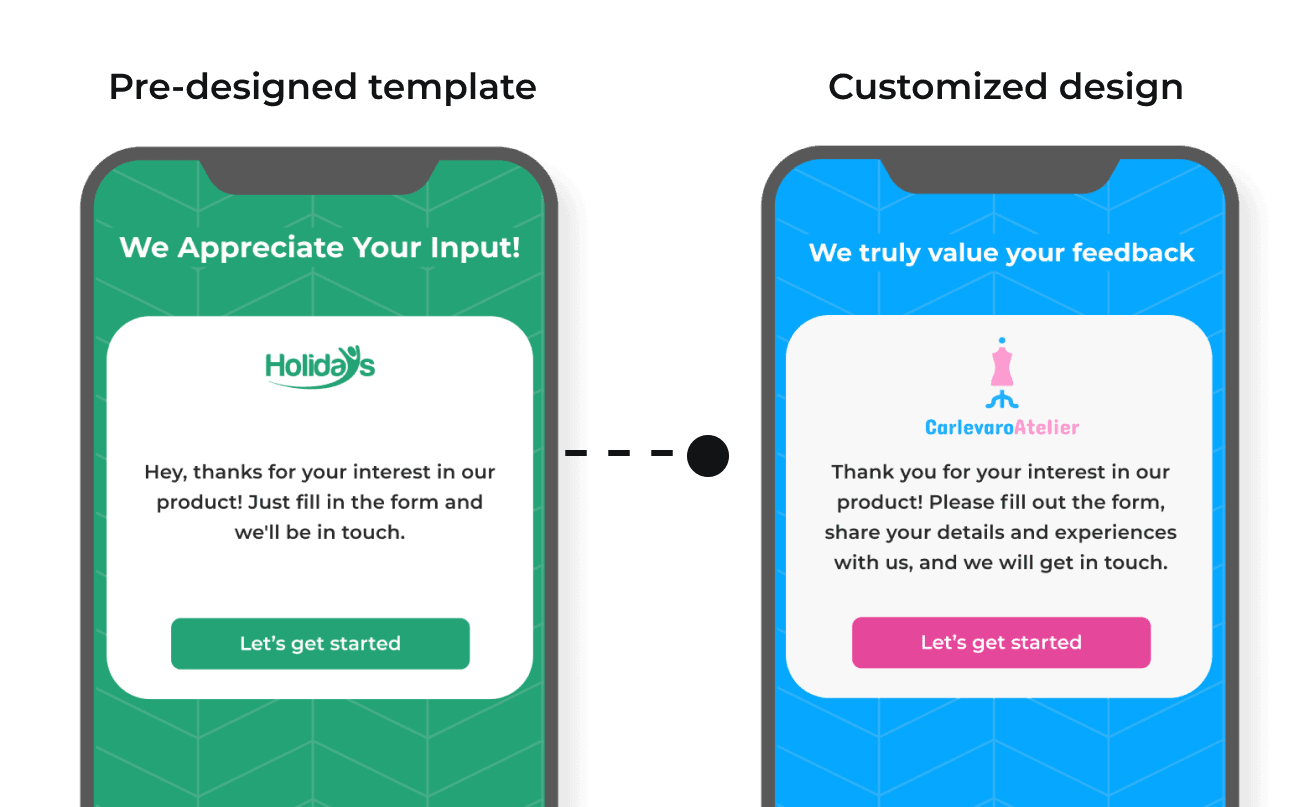
Customization
Choose from pre-designed Feedback QR Code templates and customize your feedback form as per branding requirements by changing template colors, fonts, text size, and more. Ensuring your feedback forms reflect your brand creates a cohesive experience for your customers and builds trust.
Choose from pre-designed Feedback QR Code templates and customize your feedback form as per branding requirements by changing template colors, fonts, text size, and more. Ensuring your feedback forms reflect your brand creates a cohesive experience for your customers and builds trust.

Create & Edit Easily
Design landing pages from scratch with a logo, start page, feedback questions, success page, social media profiles, and more. The best part? You can edit the linked content at any time, allowing for real-time updates based on evolving feedback or changing business needs.
Design landing pages from scratch with a logo, start page, feedback questions, success page, social media profiles, and more. The best part? You can edit the linked content at any time, allowing for real-time updates based on evolving feedback or changing business needs.
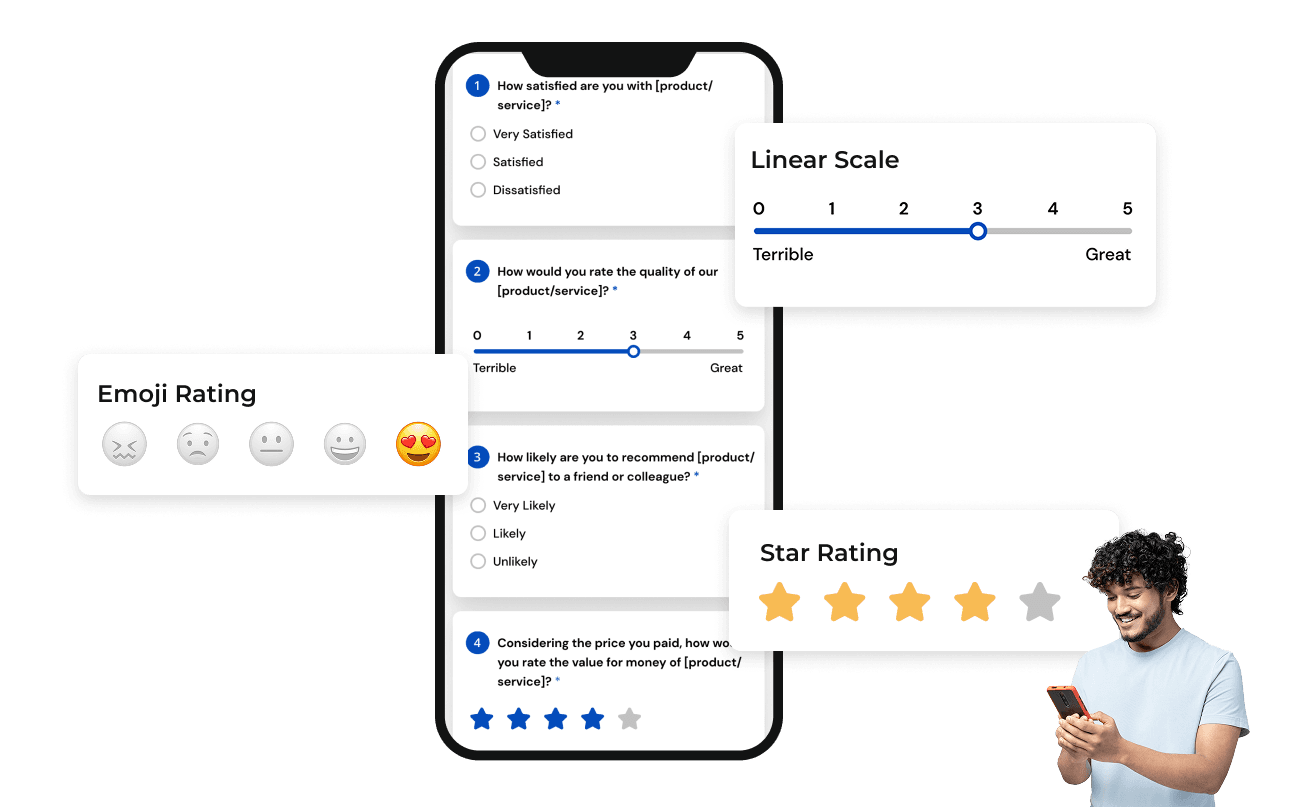
Feedback Options
Gather feedback via short answers, star ratings, emojis, drop-down list, linear scale, checkboxes, and more. Scanova offers diverse feedback options to suit various customer preferences and needs, ensuring you gather comprehensive feedback that drives meaningful improvements in your offerings.
Gather feedback via short answers, star ratings, emojis, drop-down list, linear scale, checkboxes, and more. Scanova offers diverse feedback options to suit various customer preferences and needs, ensuring you gather comprehensive feedback that drives meaningful improvements in your offerings.
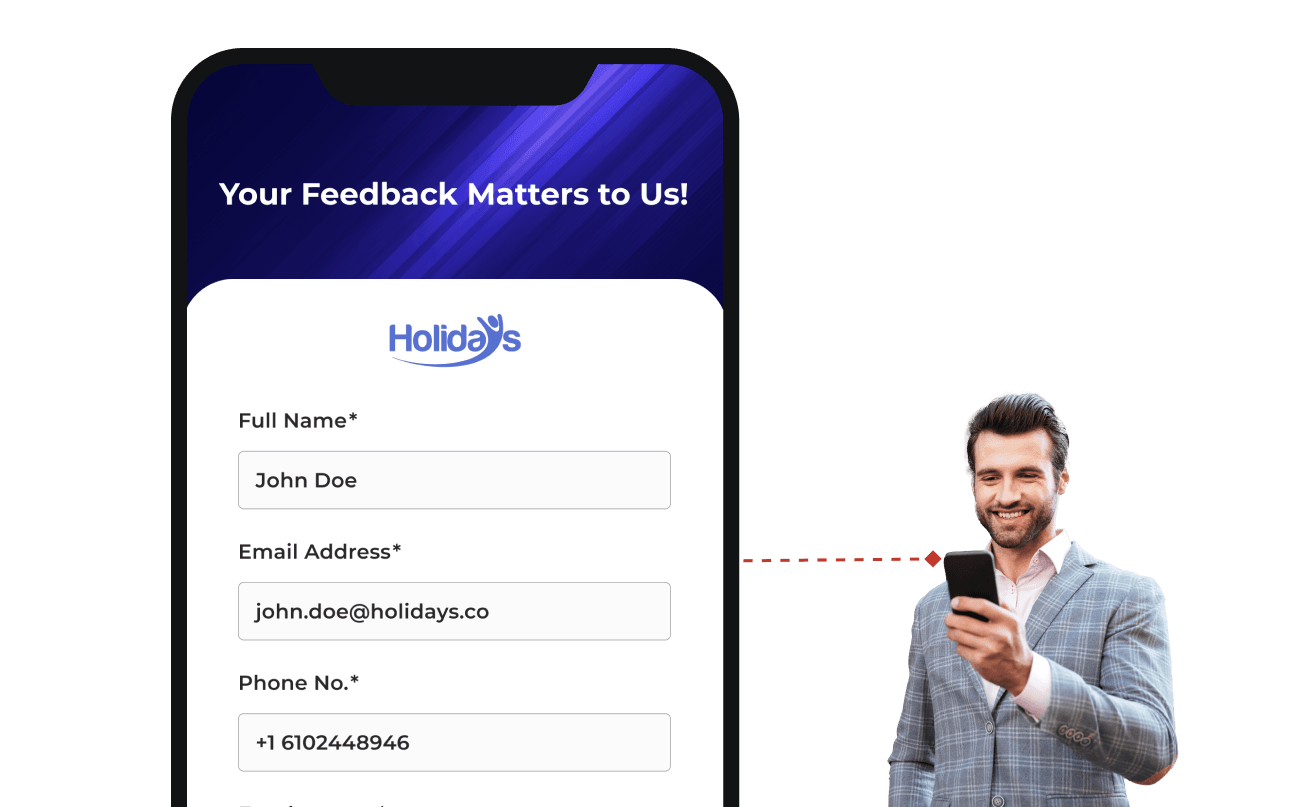
Get Contact Details
Get customer contact details like name, phone number, and email. This valuable information can be leveraged for personalized communication strategies, enhancing customer retention efforts, launching targeted campaigns, and creating remarketing opportunities.
Get customer contact details like name, phone number, and email. This valuable information can be leveraged for personalized communication strategies, enhancing customer retention efforts, launching targeted campaigns, and creating remarketing opportunities.
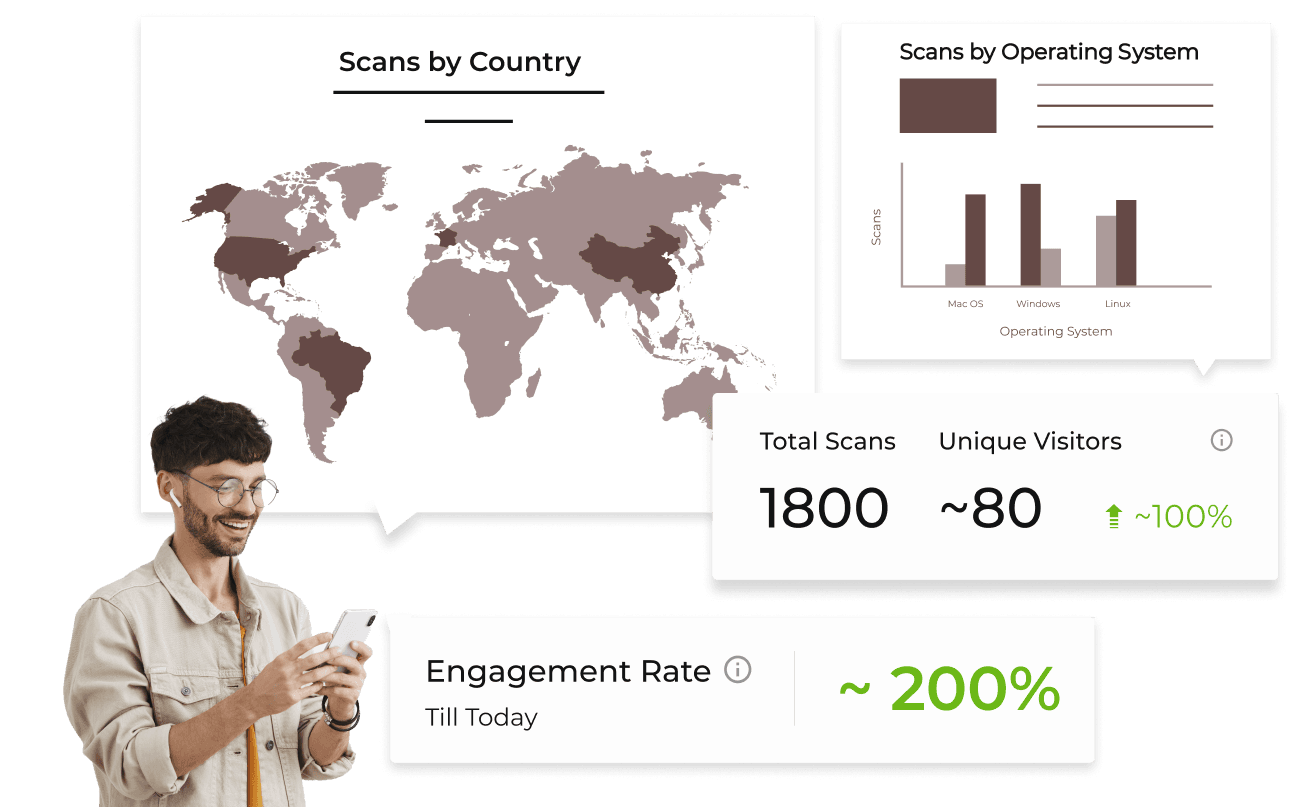
Analytics
Get scanning device details, exact GPS location, and other Analytics to understand customer behavior. This data is crucial for understanding how customers interact with your feedback forms and can help inform future marketing strategies and product improvements tailored to meet their needs.
Get scanning device details, exact GPS location, and other Analytics to understand customer behavior. This data is crucial for understanding how customers interact with your feedback forms and can help inform future marketing strategies and product improvements tailored to meet their needs.
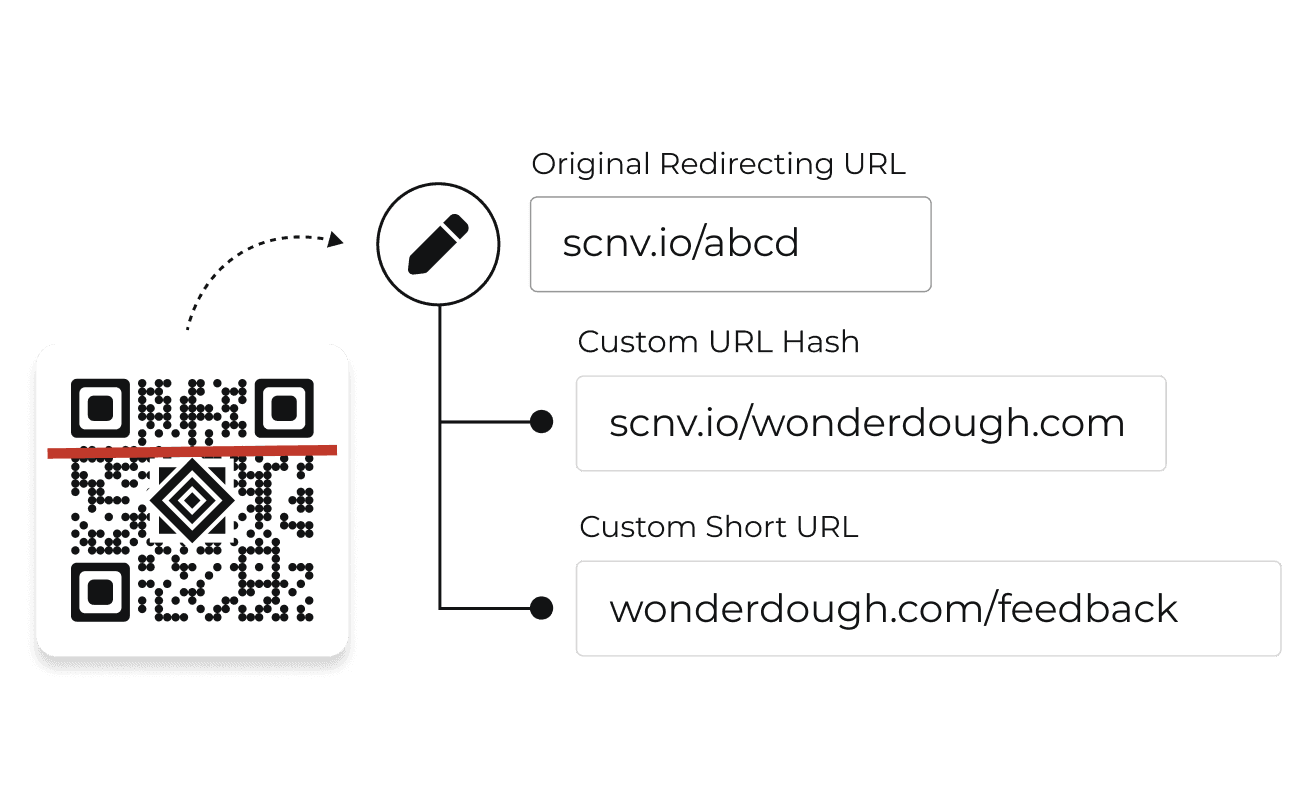
Customize Short URL
Create brand awareness by using personalized link (like https://wonderdough.com/feedback) instead of generic short URL (like https://scnv.io/abcd). This also instills confidence in users when sharing their feedback. A recognizable and branded link enhances trust and encourages more users to engage.
More on Custom Domain >
Creating Dynamic Feedback QR Codes
Follow these steps to create QR Codes for feedback

Select Category
Log in to Scanova . Go to Create QR Code from the navigation panel. Opt for Feedback QR Code category.

Select Feedback Template
Select a QR Code template. Design the start page, feedback form, and success page to reflect your brand. Add logo, customize color, change font, and more.

Create QR Code
Provide QR Code name and tags (optional). For Dynamic QR Code, you can enable advanced settings like age restriction and lead generation. Once done, click on Create QR Code.

Customize & Download
Once your QR Code is created, directly test and download it. You can also customize the code as per branding needs and then download it.
Top choice of global brands like Amazon, AT&T, Nestle, and Walmart


Benefits of using Dynamic Feedback QR Codes
Feedback QR Codes offers several advantages for individuals and businesses

Quick and Easy Access
Feedback QR Codes provide a seamless way for customers to share their opinions. By simply scanning a QR Code, users can instantly provide their feedback. This ease of use encourages more customers to participate, leading to a higher volume of responses and richer insights for businesses.
Feedback QR Codes provide a seamless way for customers to share their opinions. By simply scanning a QR Code, users can instantly provide their feedback. This ease of use encourages more customers to participate, leading to a higher volume of responses and richer insights for businesses.

In-the-Moment Feedback
QR Codes facilitate real-time feedback collection, allowing customers to share their experiences while they are still engaged with your service or product. This immediacy often results in more genuine and actionable insights, enabling businesses to address issues promptly.
QR Codes facilitate real-time feedback collection, allowing customers to share their experiences while they are still engaged with your service or product. This immediacy often results in more genuine and actionable insights, enabling businesses to address issues promptly.

Customization Opportunities
Feedback QR Codes offer the flexibility to customize the look and feel of the feedback forms according to your brand's identity. Businesses can incorporate logos, colors, and design elements that align with their brand, reinforcing brand recognition. This also builds trust with customers.
Feedback QR Codes offer the flexibility to customize the look and feel of the feedback forms according to your brand's identity. Businesses can incorporate logos, colors, and design elements that align with their brand, reinforcing brand recognition. This also builds trust with customers.

Cost-effective
QR Code surveys can reduce costs associated with traditional feedback methods, such as printed surveys or dedicated kiosks. Since QR Codes can be displayed on various materials—like receipts or signage—businesses can gather feedback without investing in expensive hardware or staffing.
QR Code surveys can reduce costs associated with traditional feedback methods, such as printed surveys or dedicated kiosks. Since QR Codes can be displayed on various materials—like receipts or signage—businesses can gather feedback without investing in expensive hardware or staffing.

Improved Customer Experience
Using Feedback QR Codes enhances customer experience by making it easier for customers to express their thoughts and opinions. When businesses actively seek out and act on customer feedback, it demonstrates that they value customer input. This encourages customers to come back again.
Using Feedback QR Codes enhances customer experience by making it easier for customers to express their thoughts and opinions. When businesses actively seek out and act on customer feedback, it demonstrates that they value customer input. This encourages customers to come back again.

Environment-friendly Option
Opting for Feedback QR Codes is an eco-friendly choice that reduces the need for paper-based surveys and forms. By going digital, businesses can minimize waste. This appeals to environmentally aware consumers and positions the brand as socially responsible.
Opting for Feedback QR Codes is an eco-friendly choice that reduces the need for paper-based surveys and forms. By going digital, businesses can minimize waste. This appeals to environmentally aware consumers and positions the brand as socially responsible.
Unlock valuable customer feedback with Feedback Survey QR Codes
Feedback QR Codes simplify feedback collection and enhance customer engagement across industries
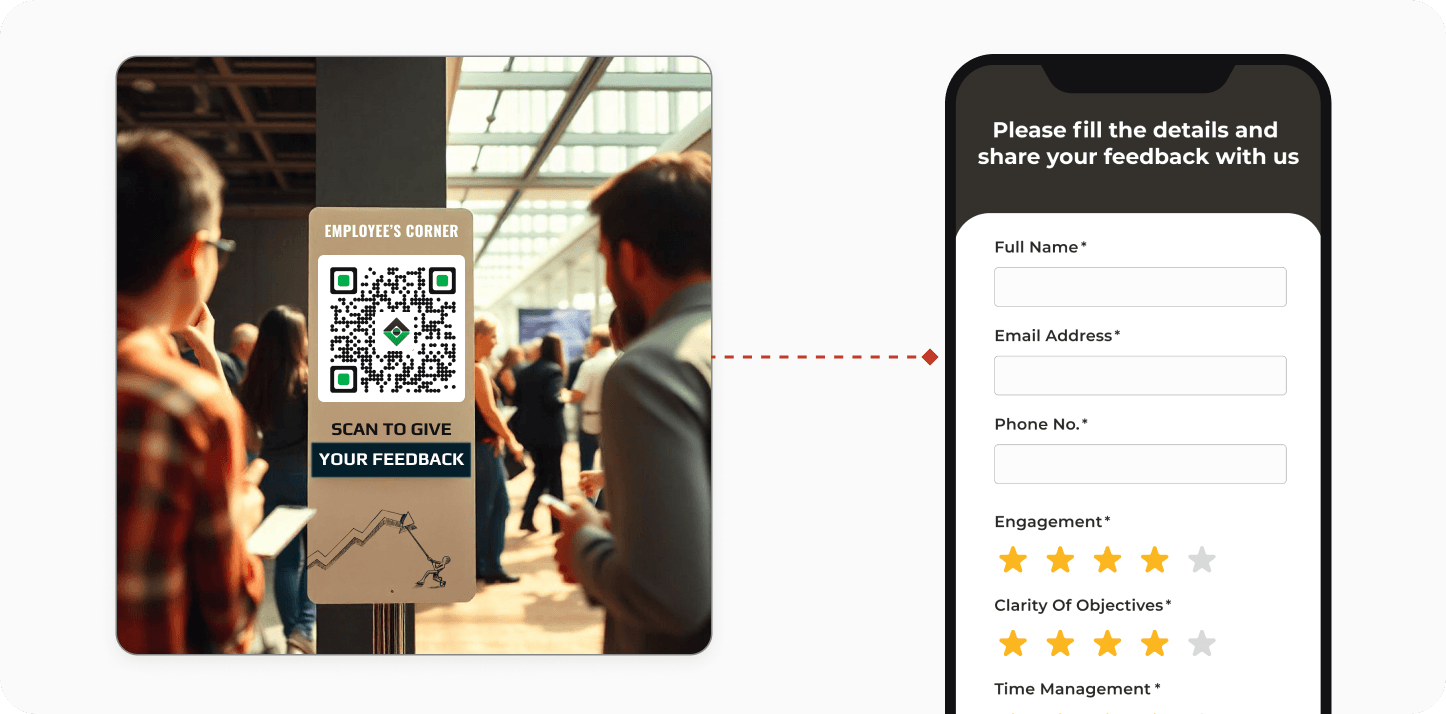
Employee Engagement
Organizations can use Feedback QR Codes during meetings or company events to gather employee feedback about workplace satisfaction and culture. This method encourages open communication and helps management understand employee needs better.
Organizations can use Feedback QR Codes during meetings or company events to gather employee feedback about workplace satisfaction and culture. This method encourages open communication and helps management understand employee needs better.
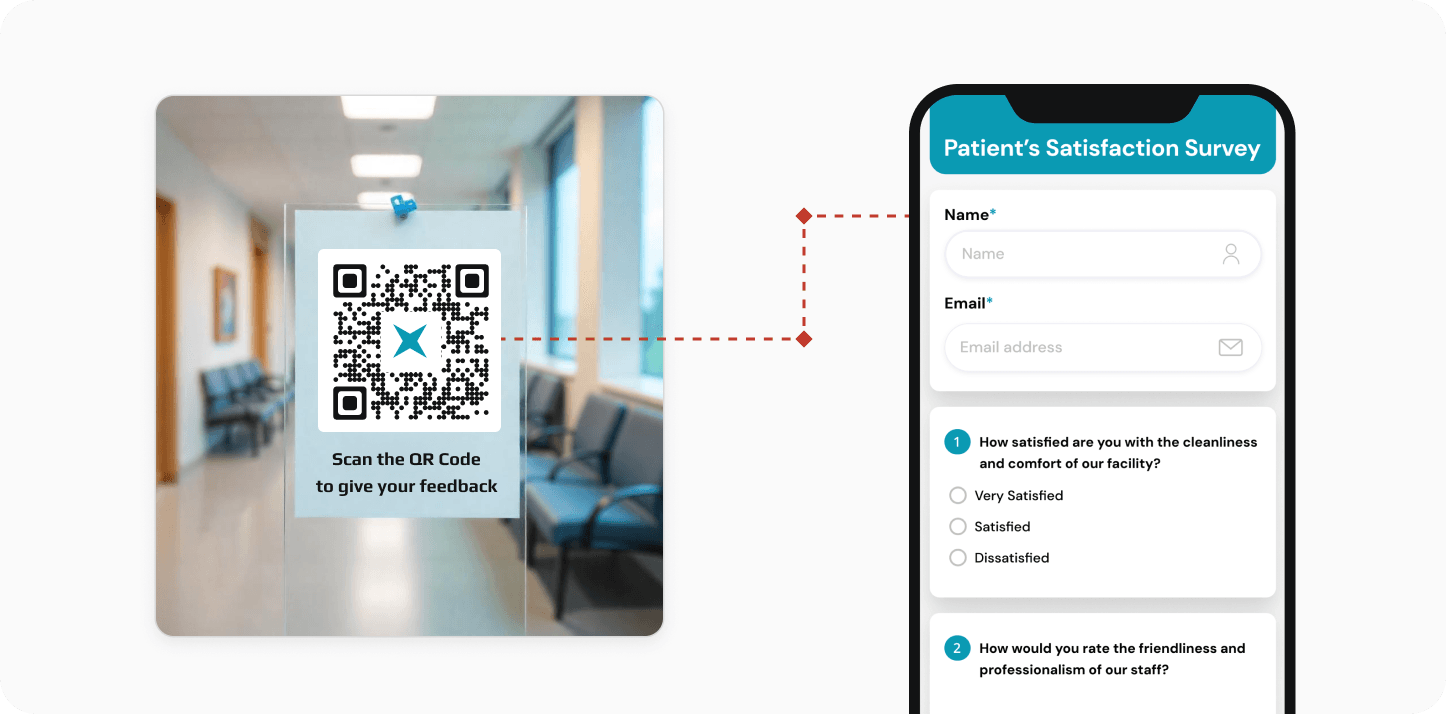
Healthcare
Hospitals and clinics can use Feedback QR Codes in waiting rooms or discharge papers to collect patient feedback about their care experience. This information is crucial for improving service quality and patient satisfaction in healthcare settings.
Hospitals and clinics can use Feedback QR Codes in waiting rooms or discharge papers to collect patient feedback about their care experience. This information is crucial for improving service quality and patient satisfaction in healthcare settings.
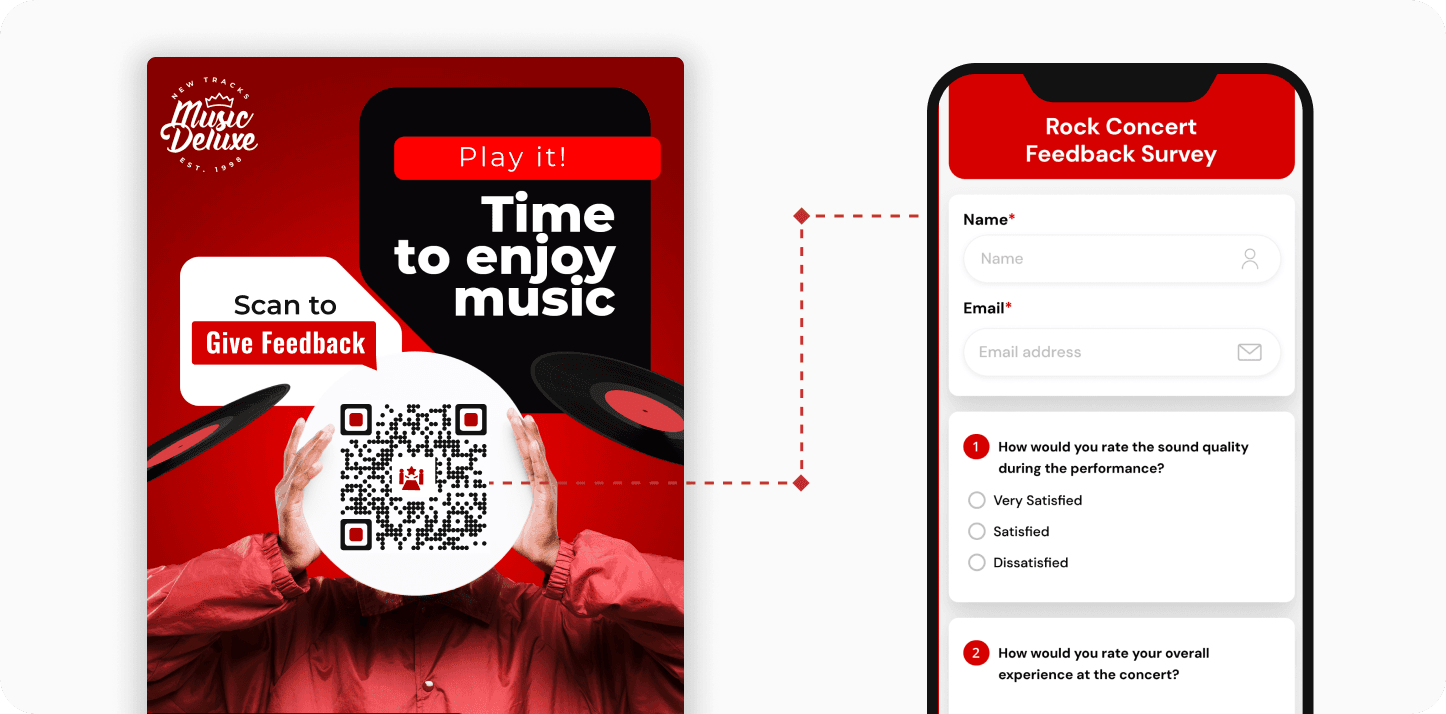
Events
At events such as conferences or concerts, organizers can distribute Feedback QR Codes on posters or other event materials. Attendees can easily scan these codes to share their experiences in real-time, allowing organizers to gather valuable insights for future events.
At events such as conferences or concerts, organizers can distribute Feedback QR Codes on posters or other event materials. Attendees can easily scan these codes to share their experiences in real-time, allowing organizers to gather valuable insights for future events.
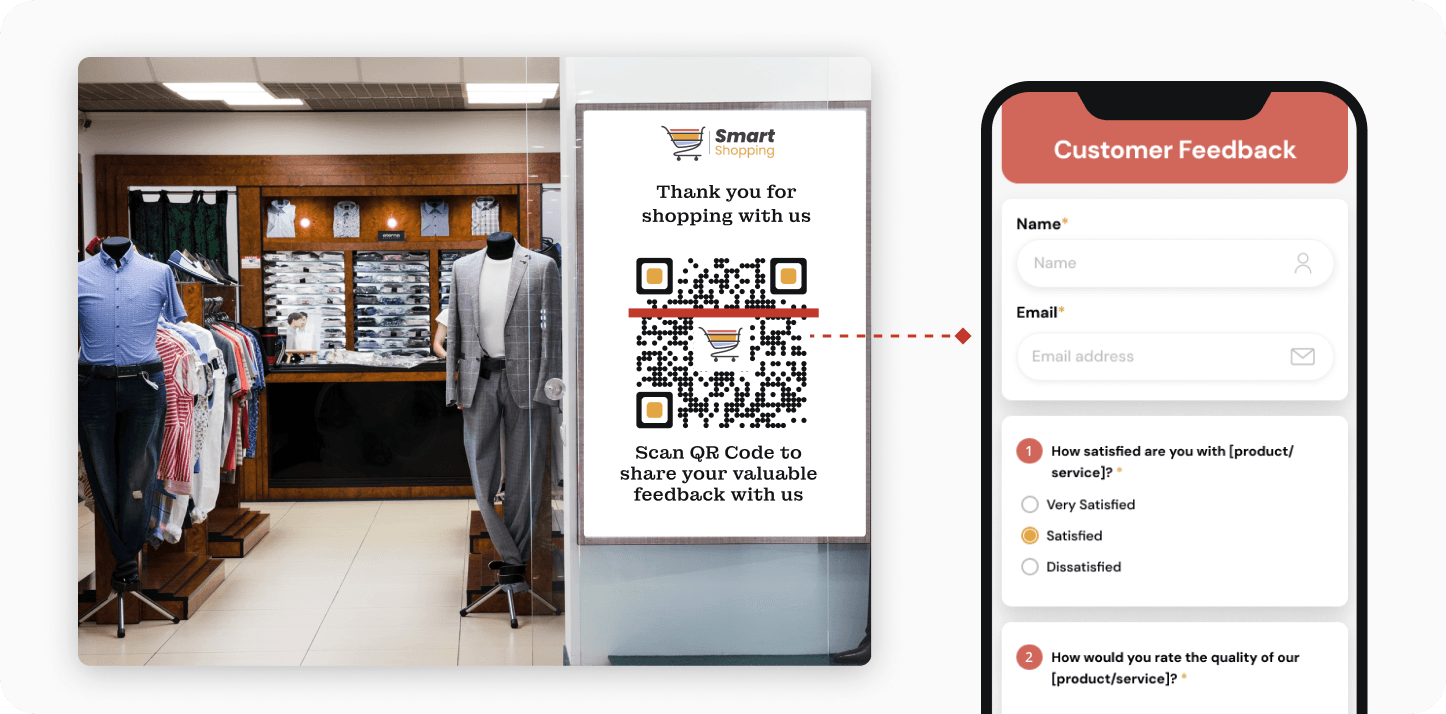
Retail Stores
Retailers can place Feedback QR Codes , on receipts, promotional displays, or checkout counters—enabling customers to provide immediate feedback about their shopping experience. This instant feedback mechanism allows retailers to understand customer preferences.
Retailers can place Feedback QR Codes , on receipts, promotional displays, or checkout counters—enabling customers to provide immediate feedback about their shopping experience. This instant feedback mechanism allows retailers to understand customer preferences.
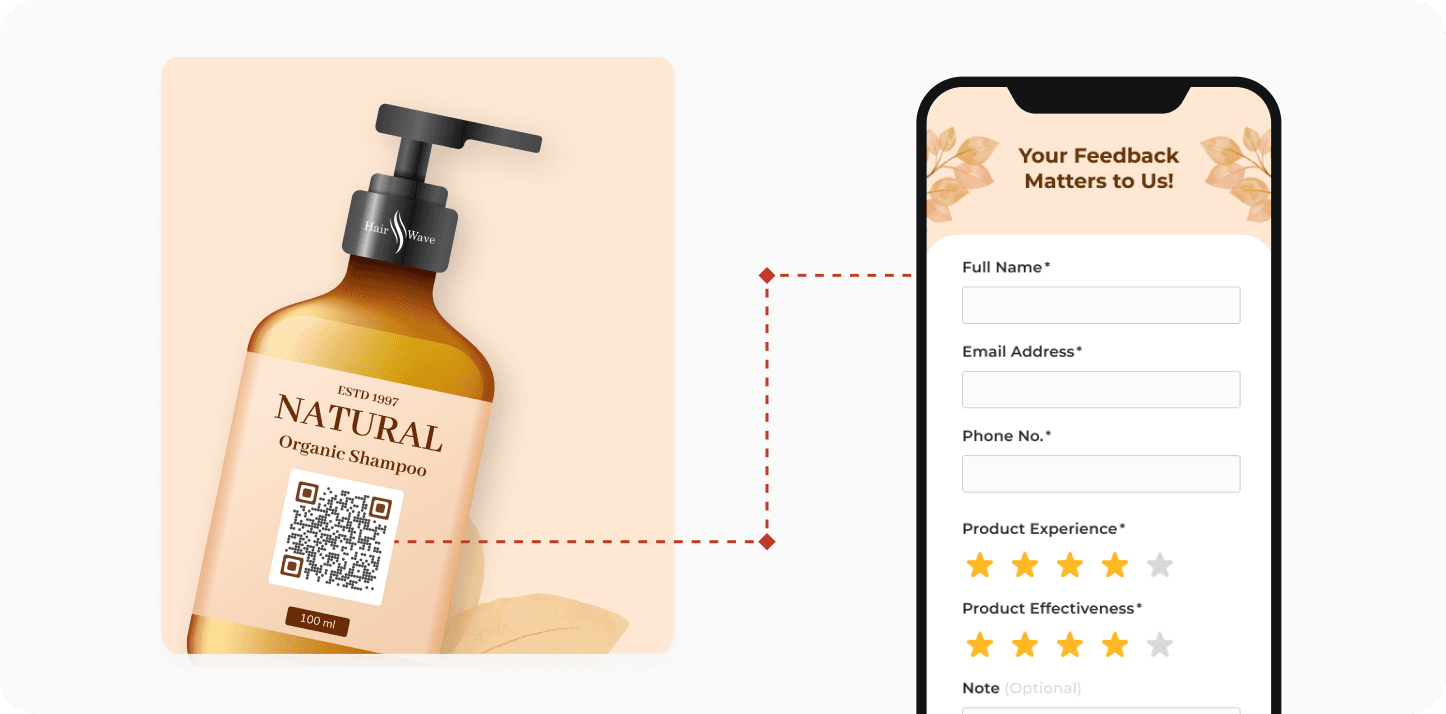
Product Packaging
Companies can include Codes on Feedback QR Codes on packaging , encouraging customers to share their thoughts after using the product. This approach not only makes it easy for customers to provide feedback but also helps businesses gather insights on product performance.
Companies can include Codes on Feedback QR Codes on packaging , encouraging customers to share their thoughts after using the product. This approach not only makes it easy for customers to provide feedback but also helps businesses gather insights on product performance.
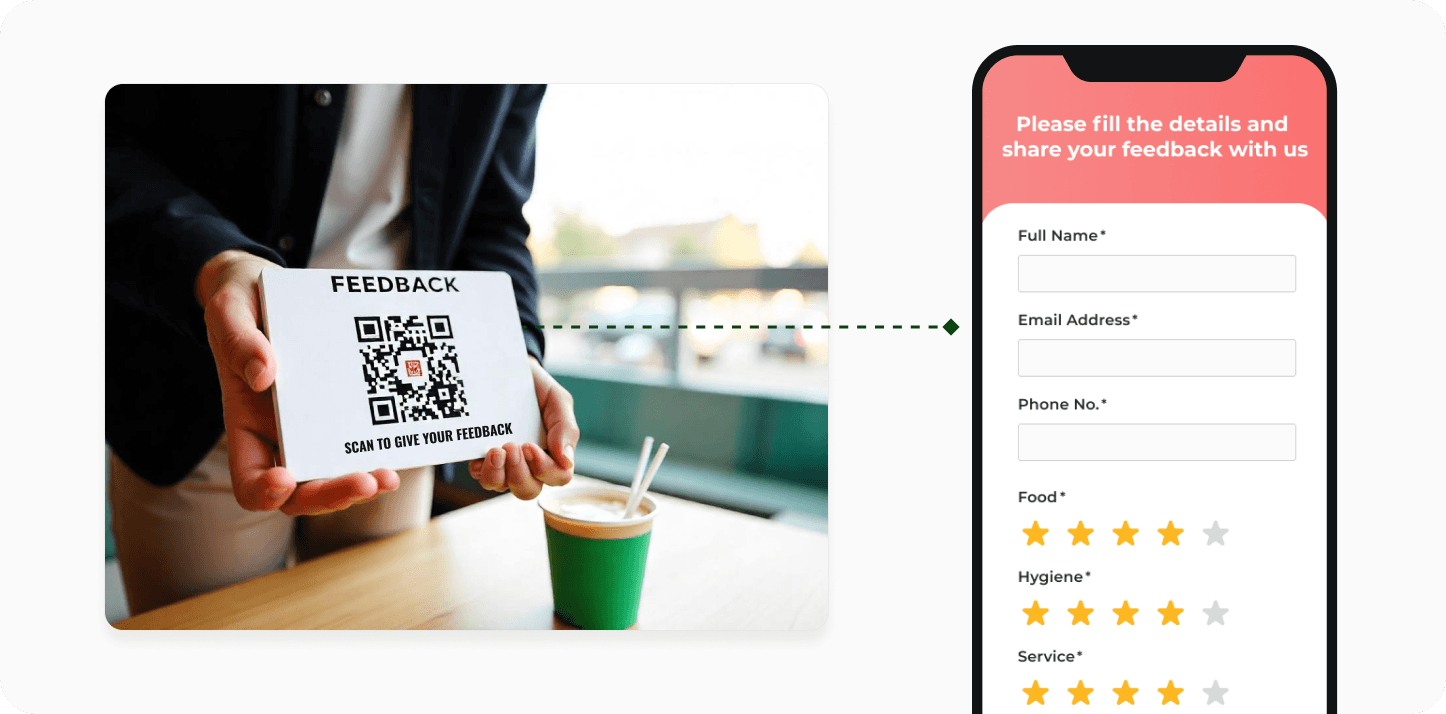
Restaurants
Feedback QR Codes can be placed on menus, receipts, or table tents—allowing diners to quickly scan and provide feedback on their dining experience, food quality, and service. This feedback helps restaurant owners make immediate improvements based on customer experiences.
Feedback QR Codes can be placed on menus, receipts, or table tents—allowing diners to quickly scan and provide feedback on their dining experience, food quality, and service. This feedback helps restaurant owners make immediate improvements based on customer experiences.
Get desired results for your business with Scanova
Best brands in the world trust Scanova QR Code Generator
 Caitlyn DuffyLarge Format Sales District Leader,PepsiCo
“The simplicity of this tool makes it easy for even non-tech users”
Easy to use and achieve successful outcomes with Scanova. The simplicity of this tool makes it easy for even non-tech users. Scanova solves the concern of tracking websites and data sheets efficiently.
 David TaitPerformance Media Lead,Yourtown
“Scanova helps us quickly create QR Codes for multiple uses”
A quick and easy tool for QR Codes. The different QR Code types and features available, including the ability to customize a QR Code based on brand requirements, are impressive. It enables the team to access, manage, create, and download their QR Codes easily. Scanova helps us quickly create QR Codes for multiple uses.
 Daniela GutierrezCDW National Business Leader,Hitachi Vantara
"We have increased our leads by 10x with Scanova"
Scanova has been a wonderful addition to our marketing toolkit. It helps us boost lead generation easily. By introducing Scanova QR Codes in our keynote presentations and booths at conferences, we have increased our leads by 10x. Scanova also makes it easy to customize lead forms, presenting a slick view back to the end user.
 Mojtaba AbediExecutive Director,Finance Maxim Ltd.
“Scanova has proven to be an invaluable tool for our events and projects”
I am quite satisfied with Scanova's services and appreciate their effort in enhancing user experience. Scanova has proven to be an invaluable tool for our events and projects. The ease of use and the range of features have significantly contributed to the success of our initiatives. I particularly appreciate the efficiency of Scanova’s team—always ready to assist.
 Marie ZeccaAdvisory Board Chair,Colorado Women's Lacrosse Officials Association (CWLOA)
“Scanova allows us to gauge interest in multiple distribution areas”
We love that Scanova provides us with demographics/location information when we use their QR Codes in a magazine ad. This allows us to gauge interest in multiple distribution areas. Scanova allows us to access data that we can directly correlate with other analytics we have to help deliver customers with a more accurate ROI on the service.
 Muthaian PrakashDirector—Digital Technology and Solutions,Olam Information Services Private Limited
“The tool has easy-to-use templates for quick implementation”
A perfect QR Code Generator for Dynamic QR Codes. The best part of Scanova is its useful options to generate Dynamic QR Codes with brand identity by adding logos, brand colors, and more. Also, the tool has easy-to-use templates for quick implementation. We have printed Dynamic QR Codes in our consumer package products in the healthy snacks category.
 Brian MarshVP Operations,I DJ NOW
“I highly recommend Scanova”
We use Scanova for our brochures and catalogs as the pricing keeps changing. It’s terrific to send our clients to our website with an easy scan. We have also used Scanova on marketing postcards and backdrops for our booth at trade shows. We love looking at the analytics reports to see how many users visited our site or a webpage. I highly recommend Scanova.
Scanova cares about your security and privacy
Experience unmatched data protection with ISO/IEC 27001:2022, GDPR, and SOC2 compliance


Frequently Asked Questions
Get answers to popular questions about Customer Feedback QR Codes
Why should I opt for Feedback QR Codes?
Opt for Scanova's Feedback Survey QR Codes to save printing costs and gather customer insights easily. Gather contact details of customers as well as their feedback with Feedback QR Codes.
Can I create Feedback QR Codes in my free trial?
Yes, you can create Feedback Survey QR Codes in your 14-day free trial. If you want to enable advanced features like Custom Domain and Event Tracking—purchase a subscription plan.
Do my customers require a specific app to scan Feedback QR Codes?
No. Customers can easily scan Questionnaire QR Codes via their smartphone's default camera app or any QR Code scanning app. Android device users can rely on Google Lens or third-party scanning apps. Those with iPhones can directly scan using the camera app.
What will happen to my Feedback QR Codes after the 14-day free trial?
Customer Feedback QR Codes are dynamic. As per Scanova's internal data, nearly 98% of QR Codes created are dynamic. These Dynamic QR Codes won't work after your free trial is over. An ongoing subscription with Scanova is required to keep Feedback QR Codes working.
Get started with Scanova
Create QR Codes as per your need with ease