Google Calendar QR Code – Modern Way to Invite People

Say you’re going to organize an event. It could be a formal one for an office or a client. Or it could also be an informal affair for friends and family.
Now you’d want people to come and attend your event. To make it happen, you’ll hand out invitation cards. Or you’ll advertise your event via promotions such as flyers, banners, and posters.
Here’s the deal—simply telling people about your event and expecting them to come isn’t enough. Not because they wouldn’t want to attend your event. But because many of them might forget about it as the date approaches near.
So what you need to do is get them to add the event to their calendar. This way, even if the date slips their mind, they’ll automatically get a reminder about the event. That means the likelihood of all the interested attendees making it to the event would increase.
And the easiest way to do so is by using a Google Calendar QR Code. This article will cover everything about the same in detail.
Also read: Types of QR Code
A. Google Calendar QR Code: A quick brief
How do you normally get the end-users to add an event to their calendars?
By sending them the invitation and hoping that they’ll block their calendar, right? But let’s be honest. It’s not that simple. That’s because they’ll first have to launch the calendar app on their phone, select the date of the event, and finally the event.
Now, this is a long process and needs effort. And you must know that such long processes translate to a reduced conversion rate (desired action).
A better alternative is to send the Google Calendar link to the attendees. But you need to have their email address or phone number to do so. And while sometimes you may have these details, it’s not always the case.
What should you then do?
Well, this is where a Google Calendar QR Code comes in handy. As the name suggests, scanning it helps the end-users add events to their calendar. And they don’t really need to type anything manually. Neither would you need their contact details.
All you need to do is put out the QR Code for your audience to scan. That’s how simple it is.
Now there are two ways in which you can create this QR Code. Let’s get started.
1. Using Calendar QR Code
A Calendar QR Code, when scanned, quickly takes your guests to their calendar application on their phone to save the event.
All you need to do is add the event date and create the QR Code. Next, you can just add it to your marketing communications.
Don’t forget to print a CTA (call-to-action statement) that tells the audience what they should expect on scanning the QR Code. For example, Scan here and add an event to your calendar.
Such small pushes go a long way in increasing the engagement rate of your campaigns.
2. Using Website URL QR Code
This is just another alternative. Here, you can create an event using Google Calendar and copy the link to it.
Next, you can head on to a QR Code generator and convert the web link into a QR Code.
We typically call it a Website URL QR Code. And when the guest will scan, it will take them to see the event on their phones and even add it to their Google Calendar.
Then they can just save the date for the event.
However, here’s the thing—with this alternative, you’ll have to use two different tools (Google Calendar and a QR Code generator) to do the job. While in the previous option, you need to only use one tool (QR Code generator).
Now that you know the basics of a Google Calendar QR Code, let’s see how to create one.
Related: Types of QR Codes
B. Two different ways to create a Calendar QR Code
1. Using a Calendar QR Code generator
There are many QR Code generators that offer this category. In this article, we’ll be using Scanova for a step-by-step guide on how to proceed:
a. Visit Scanova and create an account
b. From various QR Code categories on the dashboard, select Calendar QR Code
c. Next, add event-related details asked on the landing page and click on Continue
d. In the next step, you can name your QR Code and move to the next step
e. On your screen, you’ll see QR Code’s details and its image on the right. Under it, there will be the Edit Design option. It’ll help you design your QR Code in two different ways:
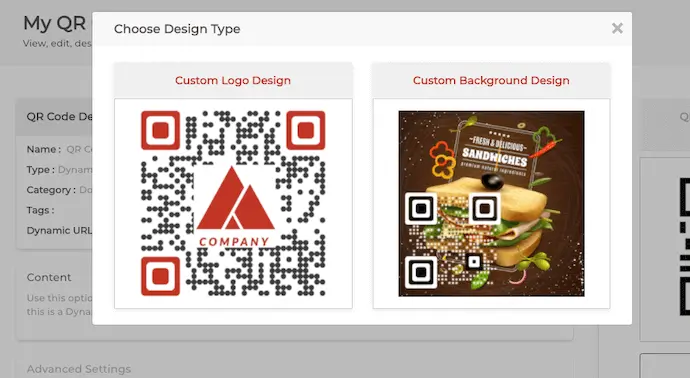
i. Custom Logo Design: Using it, you’ll be able to add a logo and colors to the QR Code. In addition, you’ll also be able to change the pattern of its eyes and data pattern
ii. Custom Background Design: It’ll help you superimpose your QR Code on a background image of your choice
f. After you’re done with the design, Save Changes and click on Download
g. A pop-up will just ask you to add the size and format of the QR Code image. After you do it, click on Export
That’s it. Your Calendar QR Code will be downloaded.
You can then print it on your invitations and help your guests set a reminder on their phones.
2. Using Google Calendar and a QR Code generator
First, you’ll have to go to Google Calendar and click on the ‘+Create’ option in the top left corner. Next, add all the event-related details such as name, timings, and venue.
After you’re done, click on Save. Next, click on the event on the dashboard and tap on three vertical dots. Here you’ll see the option Publish Event. Click on it.
Now, you’ll see the shareable link to the event. Copy it and follow these steps:
a. Go to Scanova and select Website URL QR Code
b. Paste the event link you copied and move ahead. Next, name your QR Code and click on Continue
c. On the next page, you’ll be able to see all the QR Code-related details with the Edit Design option (as explained earlier). Based on whether you want to add design or not, move to the next step and download the QR Code
d. You’ll be asked to do a quick sign-up. Don’t worry, you’ll not be asked for your credit card details
e. Once you’re done, click on Download again and you’ll then have to add the size and format of the QR Code image
f. After adding these details, click on Export
That’s it. Your QR Code will be downloaded. You now know everything about a Google Calendar QR Code. All that you need to do is go ahead and create one.
