Can you make QR Codes using Scanova app on Canva? Everything you should know
In a nutshell:
- Open Canva and launch the Scanova QR Codes App from the Apps section. Generate a custom QR Code right within Canva, and add the QR Code directly to your design
- Enjoy the perfect blend of Canva’s design simplicity and Scanova’s advanced QR Code features, no coding required
Are you a small business owner designing a flyer in Canva and wondering how to include a QR Code that directs customers to your website or promo page? You’re not alone.
Modern marketing heavily relies on QR Codes as a bridge between print and digital content, and platforms like Canva make it simple for anyone to design eye-catching marketing materials.
By leveraging Scanova, a leading QR Code generator, alongside Canva, you can supercharge your designs with scannable codes that engage your audience.
In this comprehensive guide, we’ll show you how to use Scanova and Canva together to create QR Codes, explain the benefits, and share best practices and examples.
So, let’s get started and see how you can make QR Codes using Scanova app on Canva!
A. Does Canva allow you to create QR Codes?
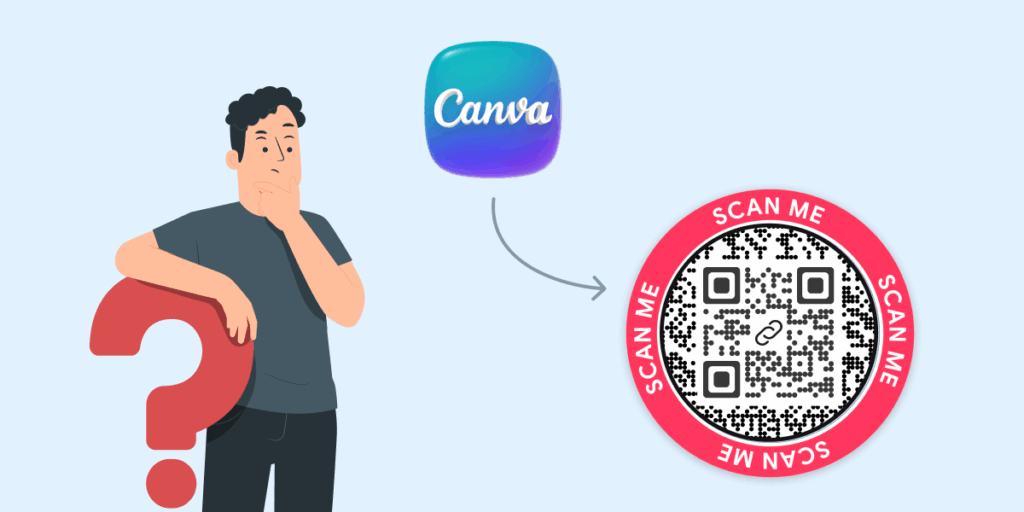
Yes, Canva does have a built-in QR Code generator, but it’s limited.
Recognizing the importance of QR Codes, Canva introduced a free QR Code generator within its editor. You can find it by clicking Apps on the Canva sidebar and searching for “QR Code.”
This built-in tool allows you to enter a URL and instantly add a QR Code to your design. However, Canva’s native QR Code feature can only create static QR Codes.
This means the QR Code it generates simply encodes the fixed URL you provided, with no additional features.
It’s fine for a quick solution, say, linking to your website or online menu, but it has some limitations:
- Limited content types: Canva’s QR app mainly supports URLs. You can’t directly create other types of QR content (like a vCard contact or an email QR Code) using Canva’s default generator.
- No advanced design customization: The QR Codes from Canva are basic black-and-white by default (though you can adjust the foreground and background color slightly)
- There’s no option to add a logo in the middle, apply a decorative frame, or change the pattern of the code dots.
- Static only: As mentioned, Canva generates static codes. Static QR Codes work forever and are free, but you cannot edit the link or track scans after the code is created.
If you made a typo in the URL or need to change where it points, you’d have to create a brand new QR Code and update your design. Likewise, you won’t get analytics on how often or where the code was scanned.
- No scan analytics: With Canva’s free QR Codes, you won’t know how many people scanned your code or when/where they did so, since static codes don’t have tracking capabilities.
In summary, Canva’s built-in QR generator is quick and easy, but it lacks advanced features. Think of it as a simple tool for when you need a plain QR Code in a pinch. If your needs are minimal (e.g., a one-time event flyer with a link), it can do the job.
But if you want to create a more polished and powerful QR Code for your marketing materials, you’ll want to use a dedicated tool like Scanova. Here’s where Scanova comes in.
Rather than being limited to Canva’s basic QR features, you can use Scanova to generate a feature-rich QR Code and then import that into your Canva design. This opens up a world of possibilities that we’ll explore below.
Key Takeaways:
- Canva has a built-in QR Code generator, but it’s basic and static-only.
- You can use it to link a simple URL, such as a website or menu, but not for advanced content types, like vCards or emails.
- Canva’s native QR Codes offer limited customization, with no options for logo, frame, or pattern styling.
- The generated QR Codes cannot be edited or tracked once created, and you’ll get no scan analytics.
- For dynamic, customizable, and trackable QR Codes, use the Scanova QR Codes Canva App, which lets you create feature-rich codes directly within Canva.
B. How to make QR Codes using Scanova app on Canva?
Step 1: Start by visiting Canva on your web browser or opening the Canva desktop/mobile app.
Once logged in, you’ll land on the Canva home dashboard, where you can access all your recent designs and templates.
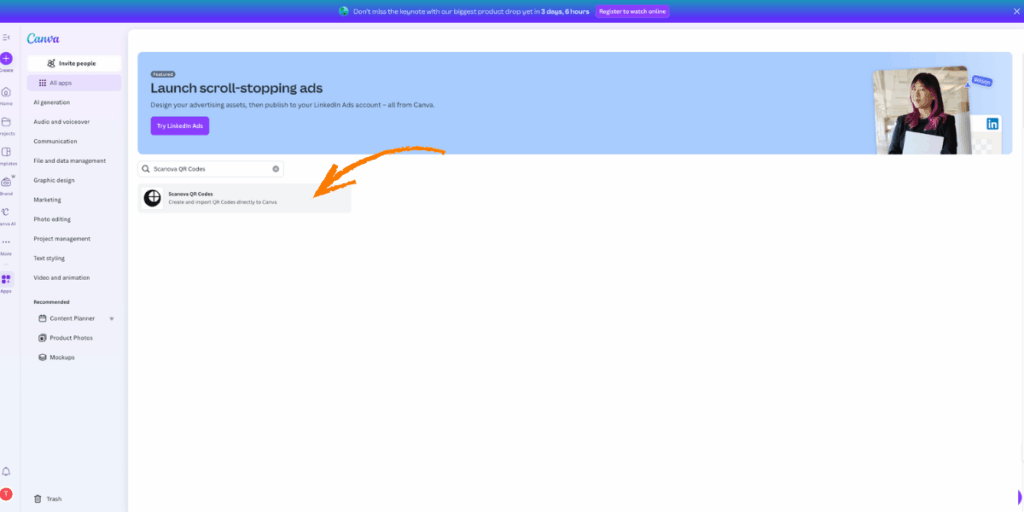
Step 2: Look to the left of the navigation bar on your Canva dashboard.
Scroll down and click on “More”; this will expand a section showing additional integrations and tools available within Canva.
From here, select “Apps.”
The Apps panel allows you to connect third-party tools, such as Scanova, that extend Canva’s functionality.
Step 3: In the search bar within the Apps section, type “Scanova QR Codes.”
You’ll see the official Scanova integration appear as the first search result.
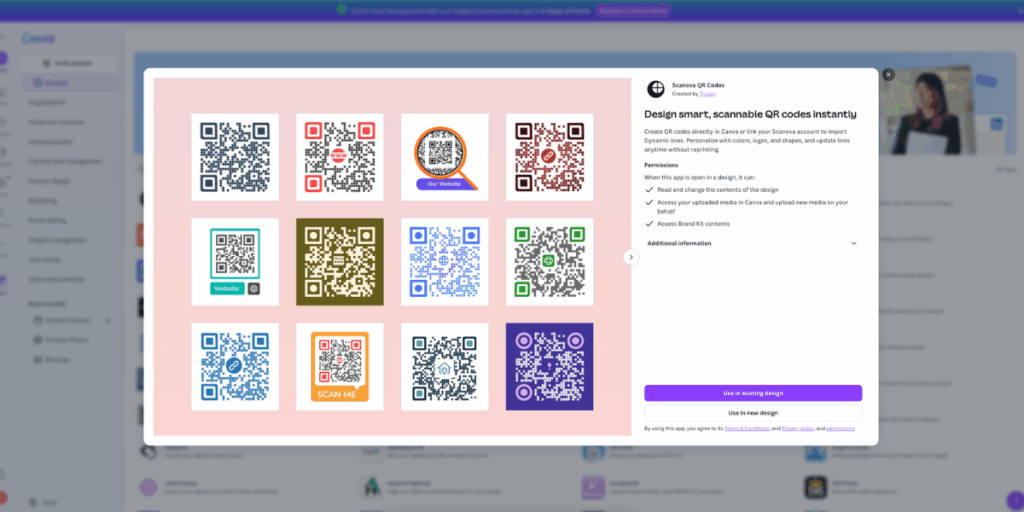
Click on it to open the integration setup page.
This app enables you to generate both Static and Dynamic QR Codes directly within Canva, eliminating the need to switch tabs or manually upload images.
Step 4: Once the app opens, Canva will ask if you want to:
- Use the QR Code inside an existing design, or
- Create a new design from scratch
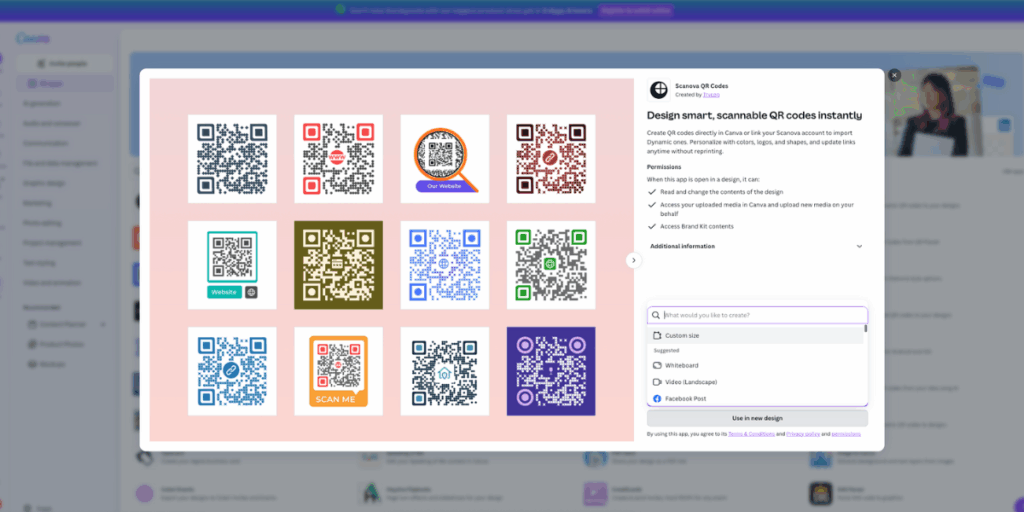
For this tutorial, select “Create new design.”
This ensures you can view the full process, from generating the QR Code to embedding it into a fresh layout.
Step 5: You can now choose your canvas dimensions. Canva offers presets like Instagram post, poster, flyer, or business card, or you can set a custom size (e.g., 1080×1080 px).
For demo purposes, let’s select “Instagram Post” to create a shareable design.
Once you click the size, Canva will open a blank canvas ready for editing.
Step 6: You’ll now see a clean white canvas.
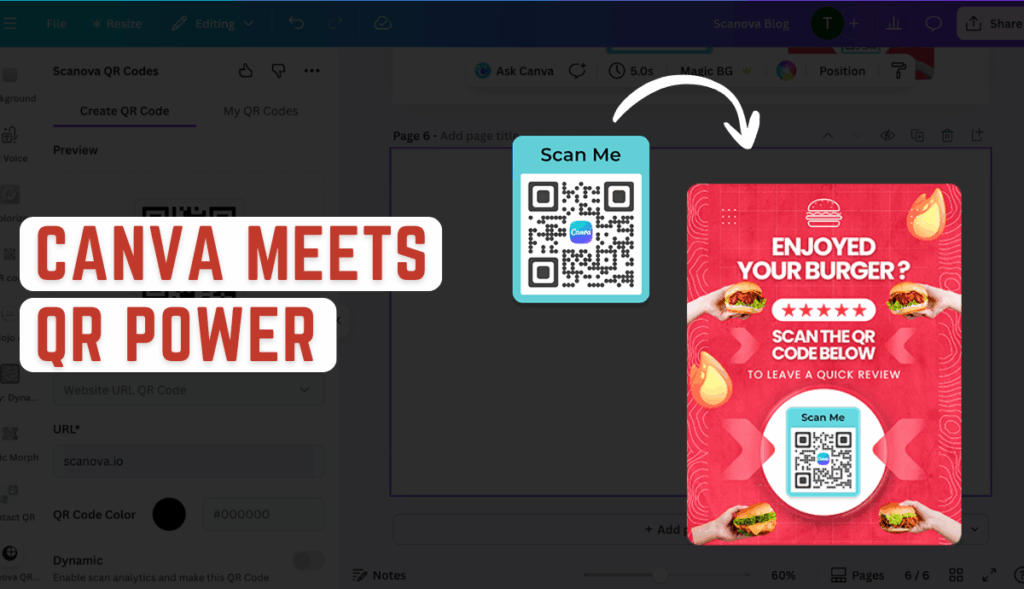
From the left sidebar, you’ll find the Scanova QR Codes app icon already added. Click it.
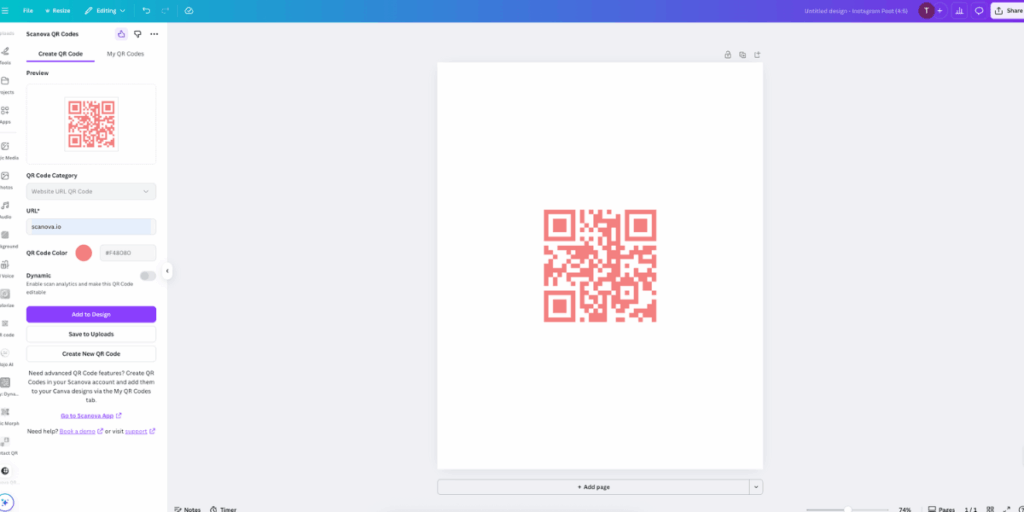
You’ll be prompted to choose the QR Code type. For demonstration, choose “Website URL QR Code.”
Step 7: You’ll now see a form asking for your website URL.
Paste your desired link (for example, your business website, product page, or landing page).
Next, you can personalize your QR Code:
- Change the color to match your brand palette
- Adjust the pattern style or add an embedded logo (optional, depending on design type)
Once done, click Generate QR Code.
A Static QR Code will be created instantly and displayed in your Canva sidebar, ready to be dragged and dropped onto your design.
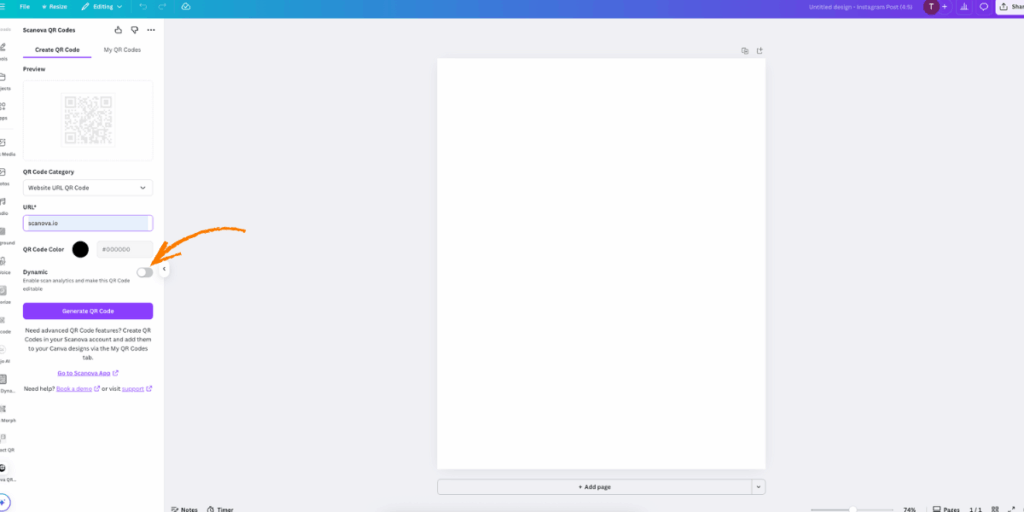
Step 8: Want the ability to edit your QR Code’s destination later or track scans?
Simply toggle on “Dynamic QR Code” in the Scanova app window.
You’ll be prompted to sign in or connect to your Scanova account.
Dynamic QR Codes give you extra control; you can update the linked content at any time without needing to reprint or re-upload your Canva design.
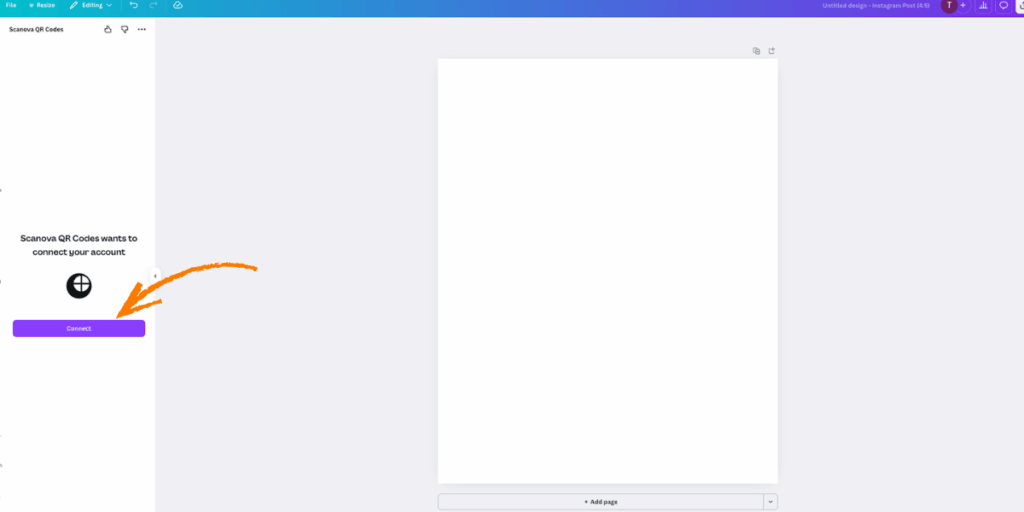
Step 9: A new window will open where you can authorize Canva to access your Scanova account.
Click “Connect” and follow the sign-in process using your Scanova credentials.
This secure integration ensures your previously created QR Codes are linked directly within Canva.
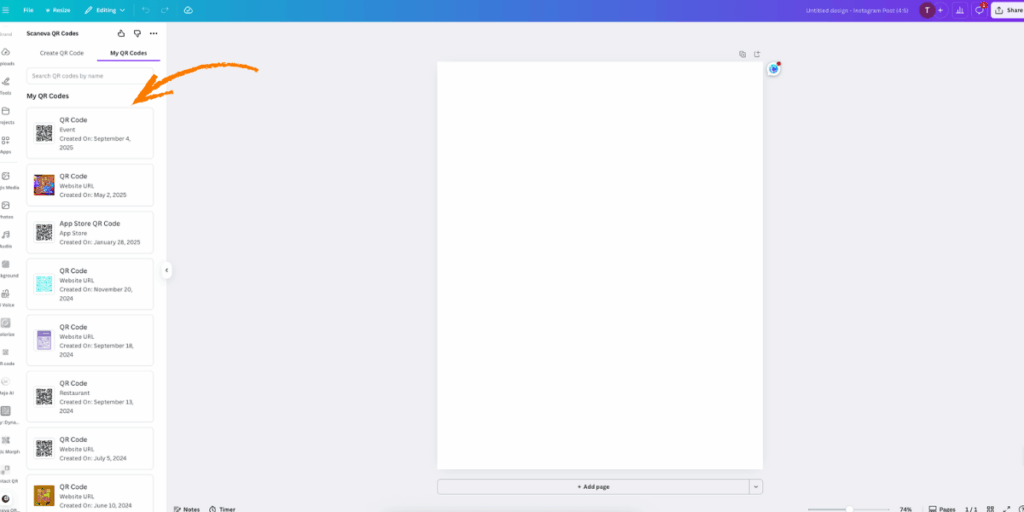
Step 10: Once connected, you’ll land on a Scanova dashboard view inside Canva.
Here, you’ll see all the QR Codes you’ve generated in your Scanova account.
Simply drag and drop any of these codes directly into your Canva canvas, just as you would add an image or graphic.
You can resize, align, and place them anywhere within your design (e.g., bottom-right corner of a flyer or center of a product label)
That’s it! You’ve successfully added a QR Code using the Scanova QR Codes app for Canva.
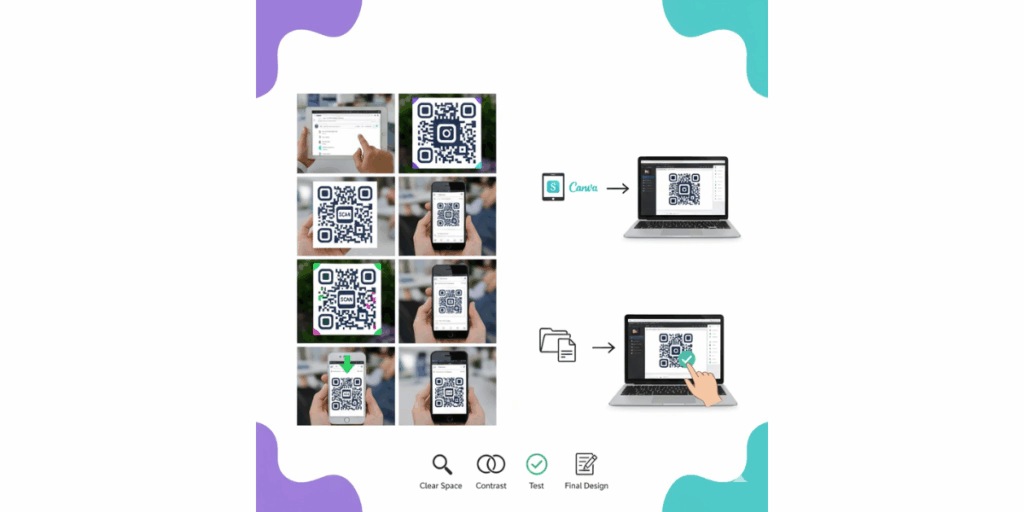
Before you finalize your design, test your QR Code using your phone’s camera or scanner app to ensure it directs to the correct link.
Once confirmed, click “Download” (top right corner) and choose your preferred format: PNG, JPG, or PDF.
You can now use this design for printing, sharing, or digital campaigns.
Key Takeaways
- The Scanova QR Codes App for Canva allows you to create and insert QR Codes directly within your design, eliminating the need to switch tabs or manually upload files.
- You can generate both Static and Dynamic QR Codes right inside Canva.
- Static QR Codes are quick and free, but can’t be edited or tracked later.
- Dynamic QR Codes enable you to update links, access analytics, and manage codes directly through your Scanova account.
- The setup is simple:
- Open Canva → Go to Apps → Search “Scanova QR Codes”
- Choose your design size → Open the app → Enter your link
- Customize color, style, or add a logo → Click Generate QR Code
- (Optional) Connect your Scanova account for dynamic QR Codes and analytics
- Open Canva → Go to Apps → Search “Scanova QR Codes”
- You can drag and drop your generated QR Code onto any Canva design and download it in your preferred format (PNG, JPG, or PDF).
- Always test your QR Code before finalizing to ensure it links correctly.

C. How to create a QR Code with Scanova and add it to Canva (Step-by-Step)
Creating a QR Code via Scanova and using it in your Canva design is a simple process. You don’t need any technical know-how; if you can use Canva, you can do this too. Here’s how you can do it:
Step 1: Generate your QR Code using Scanova
1. Go to the Scanova QR Code generator: Open your web browser (on your computer or iPad, etc.) and head to Scanova’s website
2. If you don’t have an account yet, you can sign up for free; if you already have one, log in. (You can try it without logging in if you’re making a static code, but if you want a dynamic QR Code with editing/tracking, logging in or the free trial is recommended.)
3. Select the QR Code type: Once you’re in Scanova’s dashboard, you’ll see a variety of QR Code category options (it might show icons or a list of content types). Select the option that best suits what you want your QR Code to do. For example:
- Website URL: if you want to lead scanners to a webpage (your company site, a product page, an event landing page, etc.).
- Text: for embedding a chunk of text or a message directly in the QR (scanning it will show the text).
- vCard: for making a digital business card QR Code that saves your contact info to someone’s phone.
- Email: to open a new email draft to a specified address.
- File/PDF: to allow people to download a PDF (like a menu or brochure).
- …and many more (Scanova offers everything from Wi-Fi QR Codes to social media profile QR Codes)
4. Click on the category that matches your use case
5. Enter the content or data: After selecting the QR Code type, Scanova will prompt you to input the necessary information. This will differ based on type:
- If you choose a Website URL, paste the full URL (including “http://” or “https://”) of the page you want the QR Code to direct to.
- If it’s a vCard, you’ll have fields for name, phone, email, and more. Fill those out.
- For Text, you’ll just type your text message.
- (Each category will have relevant fields – just fill in what’s asked for your chosen QR content.)
6. Choose static or dynamic: For many content types, Scanova provides an option to make the QR Code dynamic. If you see an option like “Dynamic QR Code” or “Editable/Trackable,” decide if you need it.
- Static is free and permanent, but can’t be changed later (the data is fixed in the code).
- Dynamic might require a paid plan (following a free trial), but it allows you to edit the code’s content later and track analytics. If you plan to reuse this QR Code in the long run or want scan statistics, dynamic is worth considering.
(For a one-off flyer that’ll only be used for a short campaign, static might be okay. But for something like a business card QR that you might want to update or know how often it’s scanned, dynamic is beneficial.)
7. Customize the design: Here’s the fun part: designing your QR Code. Scanova provides a range of customization options to make your QR Code look unique. You can usually:
- Pick colors: e.g., change the black modules to another color and the white background to a contrasting one (just ensure good contrast – dark code on a light background works best).
- Add a logo or image: upload your company logo or any graphic to embed in the center of the QR Code. Scanova will integrate it into the code while maintaining its scannability.
- Apply a frame or shape: choose from templates like a circular QR Code, one with a “Scan Me” caption, or other decorative frames.
- Adjust pattern: You can sometimes choose different styles for the squares/dots (for example, rounded corners, dots, etc.)
8. Take a moment to style the QR Code in a way that matches your Canva design. For instance, if your Canva design features a white background and blue accents, you might create a blue QR code on a white background and add your logo.
The goal is to make the QR Code attractive and consistent with your design theme. Scanova’s interface will show you a preview of how your QR Code looks as you apply changes.
9. Generate the QR Code: Once you’ve input your data and set the design to your liking, click the “Generate QR Code” button (or it might say “Done” or “Save”). Scanova will now create your QR Code.
In a second or two, you should see your newly generated QR Code image on the screen
10. Download the QR Code image: After generating, look for a download option. Scanova allows you to download your QR Code in various formats, including PNG, JPG, and SVG (vector).
For Canva purposes, PNG is a good choice (it’s high quality and supports transparency, so if your QR Code has no background, it will overlay nicely). Click download and save the image to your computer. (Tip: Save it with a recognizable filename like “MyQR_Website.png” so you can find it easily.)
11. That’s it for the Scanova part! You now have a beautiful QR Code image ready to go.
Step 2: Insert the QR Code into your Canva design
- Open Canva and your design: Log in to Canva and open the design where you want to add the QR Code. This could be a fresh template or an existing design you’ve been working on.
For example, you may be creating a restaurant menu, a business flyer, or an event poster.
- Upload the QR Code image: In Canva, look at the left toolbar and click on “Uploads”. Then click “Upload files” and select the QR Code PNG image you downloaded from Scanova. Canva will upload it, and it will appear in your uploads library.
- Drag and drop the QR Code onto your design: Once uploaded, you can click or drag the QR Code image onto your canvas.
Position it where it makes sense in your layout. Common placements include a corner of a poster, the back of a business card, or the bottom of a flyer – somewhere visible but not distracting from the main message.
Resize the QR Code image as needed by dragging the corners. Ensure it’s large enough to be easily scanned by a phone (at least 1 inch / 2-3 cm in print). Canva will maintain the image quality, especially if you downloaded a high-resolution or SVG from Scanova. - Add a call-to-action (optional): It’s often a good idea to accompany your QR Code with a short instruction, such as “Scan me” or “Scan to visit our site,” in text. You can use Canva’s text tool to add a small line of text near the QR Code.
This guide helps people understand what to do and what to expect. Since Scanova offers QR Code frames with CTA text, you might have already included one in the QR image itself. If so, you can skip adding extra text in Canva.
- Finalize your design: Continue editing the rest of your Canva design until you’re happy with it.
The QR Code from Scanova is now just another element of your design; you can rotate it, add a drop shadow, or leave it as is. Just avoid altering it in ways that could affect scannability (for instance, don’t apply heavy filters or crop it). Keep a bit of empty space around the QR Code in the design (this is called the quiet zone and helps scanning).
- Download or print your design: With everything in place, you can now download your Canva design (PDF for print, PNG for digital use, etc.) or send it to print. Your design now contains a fully functional, customized QR Code that people can scan.
That’s it; you now have a Canva design with a Scanova-generated QR Code!
“That’s it. You now have a custom QR Code in your Canva design!”
Go ahead and test the QR Code with your own phone’s camera to ensure it scans to the correct content.
It should work perfectly, and you’ll see how nicely it integrates with your design compared to a generic QR Code.
As of 2025, Canva has over 220 million active users, up from 130 million in 2024. Source: thesocialshepherd
Key Takeaways
- You can create a QR Code with Scanova and seamlessly add it to any Canva design—no technical skills needed.
- Generate with Scanova:
- Go to Scanova’s QR Code Generator, log in or sign up.
- Select your QR type (e.g., URL, vCard, File) and enter the necessary details.
- Choose Static (fixed) or Dynamic (editable, trackable).
- Customize colors, logo, and frame, then download as PNG (ideal for Canva).
- Go to Scanova’s QR Code Generator, log in or sign up.
- Add to Canva:
- Open your Canva design → Uploads → Upload files → select your QR Code.
- Drag and drop it into your layout, resize as needed, and add a short “Scan Me” CTA if desired.
- Maintain a small, quiet area around the code for optimal scanning results.
- Open your Canva design → Uploads → Upload files → select your QR Code.
- Finalize and Test:
- Download your design (PDF/PNG/JPG) and test the QR Code with your phone to confirm it scans correctly.
D. Why use Scanova’s QR Code Generator with Canva?
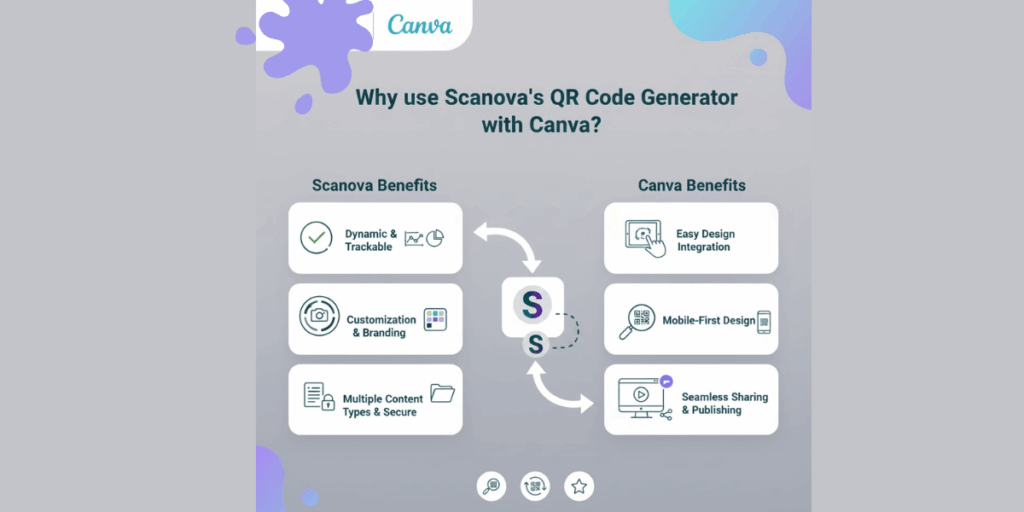
You might wonder why go through the extra step of using Scanova when Canva can create a QR code on its own. The answer lies in the capabilities and benefits that Scanova offers.
Scanova is a powerful online QR Code generator platform, and integrating it into your Canva workflow can elevate your QR Codes from simple black-and-white squares to dynamic brand assets.
Here’s why using Scanova for your Canva QR Codes is worth it:
1. Create a variety of QR Code types
Scanova isn’t limited to just website URLs. It supports generating QR Codes for almost any content you can think of. Want to share your contact info? You can create a vCard QR Code.
Have a PDF menu or brochure? Make a Document QR Code. Event coming up? Use an Event QR Code. From plain text and email addresses to Wi-Fi network credentials or Google Maps locations, Scanova has you covered
This means that whatever you’re designing in Canva, whether it’s a business card, poster, or packaging, you can create a relevant QR Code with Scanova (not just web links).
2. Advanced customization options
One of Scanova’s biggest strengths is customization. With Scanova, you can design your QR Code to match your branding or aesthetic.
Change the colors of the code (e.g., incorporate your brand’s color scheme), add your logo or an image to the center, and even choose unique patterns for the QR Code dots instead of the standard square pixels.
Scanova also offers ready-made design templates, such as QR Codes with decorative frames and calls-to-action (CTAs), like “Scan Me” text.
In Canva’s native tool, none of this is possible – you’d just get a generic-looking code. By designing the QR on Scanova, your QR Code can become an attractive part of your graphic, rather than an awkward add-on.
(For example, you could generate a QR Code with round dots in your brand’s blue and green, plus your logo at the center, to embed on a flyer – making it both scannable and on-brand.) Your QR Codes will not only work great but also look appealing, which can draw more scans.
3. Dynamic QR Codes with editing & tracking
Scanova enables you to create dynamic QR Codes (in addition to static). A dynamic QR Code is editable; you can change the content or URL it points to, even after printing it, and it unlocks scan analytics.
This is a game-changer for marketers and designers. Imagine you’ve printed 5,000 brochures with a QR Code; if it’s dynamic, you can update the code’s destination at any time (say, switch the landing page or correct a mistake) without reprinting anything.
You can also view analytics on Scanova’s dashboard to see how many people scanned the code, when they scanned, from which city, and what device they used, among other details.
Canva’s built-in codes can’t do any of that. If you’re serious about using QR Codes for business, the ability to track scans and user engagement is invaluable. It helps you measure your campaign’s success and ROI. Scanova gives you this power with ease.
4. Security and reliability
When using QR Codes professionally, you want to ensure they work flawlessly and securely. Scanova is a trusted QR Code solution provider that prioritizes reliability. The QR Codes generated through Scanova are tested for scannability and adhere to industry standards.
Plus, dynamic codes are served via secure servers. You can trust that a QR Code from Scanova won’t mysteriously stop working. And if you ever need help, Scanova provides support, something you won’t get if a Canva-generated code has issues.
In short, Scanova adds a layer of confidence that your QR Code will perform as expected and protect your data.
5. Ease of use and integration
Despite the advanced features, Scanova is very user-friendly. Even if you’re not tech-savvy, creating a QR Code with Scanova is straightforward (as we’ll show step-by-step soon). The interface is designed for simplicity: choose the type, enter your info, customize, and you’re done.
Downloading the QR Code and adding it to Canva only takes a minute. In other words, using Scanova with Canva doesn’t require any complicated process; both tools are web-based and accessible.
Canva is used in 190+ countries, covering nearly all nations worldwide. Source: famewall
Key Takeaways:
- Scanova surpasses Canva’s basic QR generator, offering advanced features that transform simple codes into dynamic, branded assets.
- Multiple QR Code types: Unlike Canva’s URL-only codes, Scanova supports vCards, PDFs, event links, Wi-Fi credentials, Google Maps, and more — perfect for any Canva project.
- Advanced design customization: Personalize your QR Codes with brand colors, logos, unique dot patterns, and ready-made templates with CTAs like “Scan Me.”
- Dynamic & trackable codes: Edit destinations anytime and access scan analytics (location, device, time, etc.) to measure engagement and ROI.
- Secure and reliable: Scanova’s QR Codes meet industry standards, are tested for flawless scanning, and use secure servers for data protection.
- Simple integration: The platform is beginner-friendly, and you can generate, customize, and import QR Codes into Canva designs in minutes.
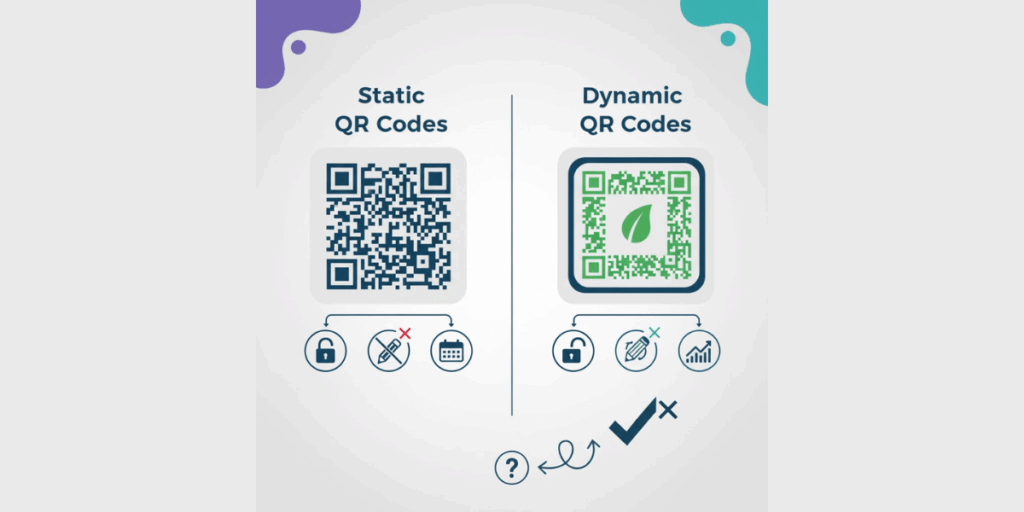
E. Static vs. Dynamic QR Codes: Which one should you use?
You may have heard the terms’ static’ and ‘dynamic’ QR Codes. We touched on this earlier, but let’s clarify it, because choosing between static and dynamic is an important decision when creating your QR Code in Scanova, especially for business use.
1. Static QR Codes
These are fixed codes. Once created, the data (URL, text, etc.) is encoded directly in the QR pattern and cannot be altered. Static codes are free to create and never expire.
For example, a static QR Code that links to your website will always point to that exact URL, forever. If you need to change the URL, you’d have to generate a new QR Code image.
Static codes also don’t track analytics (there’s no reporting of scans because no server is involved; the scan goes straight to the encoded data).
2. Dynamic QR Codes
These codes are flexible and powered by a tiny URL redirect. When you create a dynamic QR Code, the QR image typically encodes a short URL (like scanova.io/XYZ123) rather than the final destination directly.
When scanned, that short URL leads to Scanova’s server, which then redirects the user to the actual content (your website, file, etc.).
Because of this setup, a dynamic code’s destination can be edited or updated from your Scanova dashboard at any time, even after you’ve printed it on thousands of flyers.
Dynamic codes also collect scan analytics, as scans are processed by the server before being sent. The trade-off is that dynamic QR Codes require an active account/service to work (since the redirect lives on Scanova’s server).
They are usually part of paid plans (due to the ongoing service and analytics), although Scanova often offers a free trial or limited free dynamic codes for testing.
In the context of Canva designs, many types of designs, such as brochures, menus, and signage, tend to remain in use for an extended period, so using a dynamic QR Code can be a smart move.
It’s like an insurance policy; if anything changes (URL breaks, content needs refreshing), you can adjust on the fly.
It also lets you gauge engagement; for example, you print 500 flyers with a QR Code, and later you check Scanova to see that 250 people scanned it – that’s great data to have.
Cost aspect: Static codes are free on Scanova (and many other generators). Dynamic codes on Scanova require a subscription or the use of a free trial.
The good news is that dynamic QR Codes created during a free trial will continue to work for the duration of the trial, allowing you to decide if the analytics/editability value is worth it for you.
For mission-critical or long-term marketing efforts, investing in dynamic is often worth the relatively small fee, given the flexibility it provides.
To sum up, use static for simplicity and no ongoing cost, and dynamic for flexibility and feedback.
Key Takeaways:
Static vs. Dynamic QR Codes: The key difference lies in flexibility and tracking capabilities.
- Static QR Codes:
- Encode data (like a URL or text) directly into the code, which cannot be edited once created.
- Free and permanent, ideal for simple, one-time uses (e.g., linking to a fixed webpage).
- No analytics or scan tracking available.
- Encode data (like a URL or text) directly into the code, which cannot be edited once created.
- Dynamic QR Codes:
- Contain a short redirect URL that allows you to update the destination at any time via your Scanova dashboard.
- Provide scan analytics (location, time, device, etc.) to measure engagement.
- Requires an active account and is part of a paid or trial plan, as it depends on server support.
- Contain a short redirect URL that allows you to update the destination at any time via your Scanova dashboard.
- When to use each:
- Use Static for fixed content (such as permanent contact information or basic web links).
- Use Dynamic for long-term, editable, or marketing materials where tracking and flexibility matter.
- Use Static for fixed content (such as permanent contact information or basic web links).
Around 800,000 teams use paid Canva subscriptions for collaborative design projects. Source: thesocialshepherd
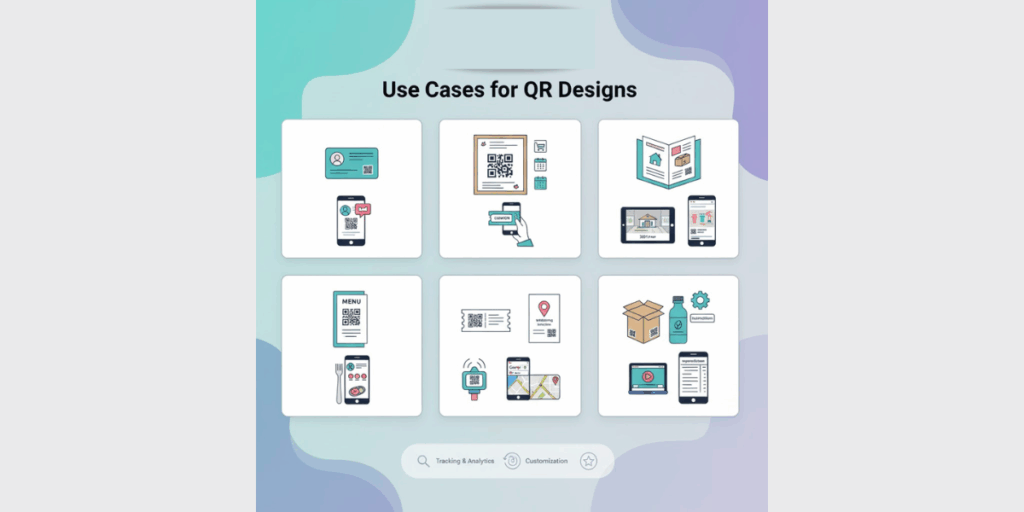
F. What are some use cases for QR Codes in Canva designs?
Now that you know how to create and customize QR Codes for your Canva designs, you might be curious about the real-world applications.
How are other businesses and professionals using QR Codes in their marketing and design materials?
Here are a few common use cases that illustrate why integrating a Scanova QR Code into your Canva project can be so powerful:
- Business Cards: A classic example. You design a beautiful business card in Canva, perhaps with your logo, name, title, and contact info. By adding a vCard QR Code, you let recipients save your contact details with one scan.
This can help you stand out at networking events. Instead of typing in your phone number or email, people can simply scan your card and instantly access all your information. It’s a modern twist that impresses and is super convenient.
- Flyers and Posters: Suppose you’re a small business owner promoting a sale or event. You create an eye-catching flyer in Canva to put around town or in your store window. Including a QR Code on that flyer can dramatically increase engagement.
For example, the QR could link to a special landing page with a coupon code, or an RSVP form for the event. Anyone passing by can scan to get more details or sign up on the spot.
This not only drives traffic to your digital content but also lets you track interest (via scan count). As mentioned earlier, using QR Codes in print can boost engagement significantly; many consumers find scanning easier than remembering a URL or phone number
- Brochures and Catalogs: If you have a multi-page brochure designed in Canva (for a trade show, real estate listings, product catalog, etc.), QR Codes can enrich it.
For instance, a real estate brochure might have QR Codes on each property page that take viewers to a virtual tour video.
A product catalog may include QR Codes that direct users to the corresponding product pages on your website for online ordering. It seamlessly bridges offline readers to online content.
- Restaurant Menus: Canva is often used to design chic restaurant menus. By adding a QR Code (generated via Scanova) to your menu, you can offer a digital menu or a direct ordering option. Many restaurants post QR Codes that link to an online menu or even an ordering app.
Additionally, following the COVID-19 pandemic, contactless menus via QR codes became hugely popular. If your menu is printed, having a QR Code that opens the latest menu on the phone can ensure customers see up-to-date items or specials (handy if you change your menu often; just update the online version and use a dynamic QR so the code on the menu always pulls the latest content).
- Event Tickets and Invitations: Designing Tickets, Invitations, or Event Posters in Canva. A QR Code can be used as the ticket itself (for entry scanning) or to provide directions and info.
Let’s say you design a conference badge; you could put a QR Code on it that, when scanned, leads to the attendee’s LinkedIn profile or a schedule. Or on a wedding invitation, a QR code could lead to a Google Maps location or an RSVP form.
Scanova’s tools can create these (such as a Google Maps QR Code for the venue location), which you can then add to your Canva invite design.
- Educational or Informational Materials: Teachers and marketers create numerous infographics, slides, and worksheets on Canva. Including QR Codes can make these materials interactive.
If you print an infographic, add a QR Code that says “Scan to learn more” and links to a video or resource. A museum might have Canva-designed info plaques with QR Codes that provide audio guides when scanned. The possibilities are endless, wherever you want to connect print to digital content.
- Packaging and Labels: If you’re a product-based business, you might design labels or box packaging in Canva. A QR Code on packaging can greatly enhance customer experience.
For example, on a food product, you could link to recipe ideas or nutrition info; on electronics, link to a PDF manual or setup video; on any product, link to a feedback form or warranty registration. These QR Codes turn passive packaging into an interactive portal for customers.
Key Takeaways:
- QR Codes make Canva designs interactive, connecting print to digital effortlessly.
- Business Cards: Add vCard QR Codes for instant contact saving.
- Flyers & Posters: Link to offers, forms, or event pages to boost engagement.
- Brochures & Catalogs: Direct readers to videos or product pages.
- Menus: Use dynamic QR Codes for updatable digital menus or ordering links.
- Tickets & Invitations: Add QR Codes for entry, RSVPs, or directions.
- Educational Materials: Link to videos or online resources.
- Packaging & Labels: Provide recipes, manuals, or links to feedback.
Conclusion
Integrating Scanova’s QR Code Generator with Canva enables you to create interactive, trackable designs that seamlessly connect offline and online experiences.
You can easily add dynamic QR Codes to any Canva project, such as flyers, labels, or business cards, without requiring technical skills. It’s a simple, cost-effective way to boost engagement and measure real results.
