How to Create a QR Code for Attendance: A Complete Guide

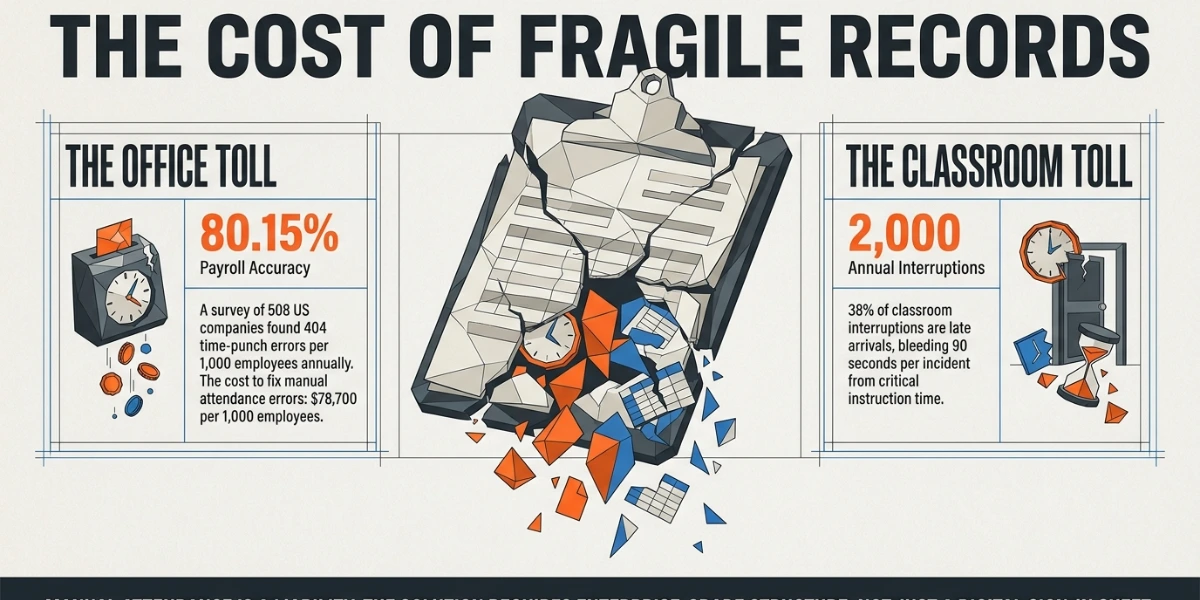
In a nutshell (TL;DR): A QR Code attendance system needs just three things: a QR Code, a form, and a spreadsheet or dashboard to record attendance. Start by choosing between a shared QR Code or a unique code for each person, then create the form, turn its link into a dynamic QR Code, print and place it, and test the data flow. Dynamic codes let you change the destination without reprinting. Shared codes are easier to misuse, so add safeguards to prevent people from sharing screenshots. Finally, get the QR print size, error correction, and quiet zone right, and remember that attendance data is personal data subject to privacy and compliance requirements such as GDPR, FERPA, and US wage laws.
I used to run a paper sign-in sheet at events. It looked fine. It was not fine.
Names were unreadable. Times were guesses. Half the sheet got copied into a spreadsheet a week later, badly. And the cost of that sloppiness is real.
EY surveyed 508 US companies and found that the average payroll accuracy rate is just 80.15%. Missing or incorrect time punches were the single most common error. They hit 404 times per 1,000 employees a year and cost about $78,700 per 1,000 employees to fix.
Classrooms lose time too. Education Week reports that a typical classroom faces more than 2,000 interruptions a year, and late arrivals cause 38% of the ones that come from outside. Each one runs about 90 seconds.
A QR Code fixes the boring part of this. People scan, type their name once, and the timestamp writes itself.
Scanning is also normal now. Eventbrite found that 41% of event organizers already use QR Codes, making them the second most adopted event technology after Wi-Fi.
Ali Iskender, a researcher at the University of South Carolina who surveyed 900 people and businesses, put the shift plainly: “During COVID, technology adoption accepted by individuals was equivalent to a decades-long adoption level.”
So let’s now learn how to create a QR Code for attendance!
A. How a QR Code attendance system works?
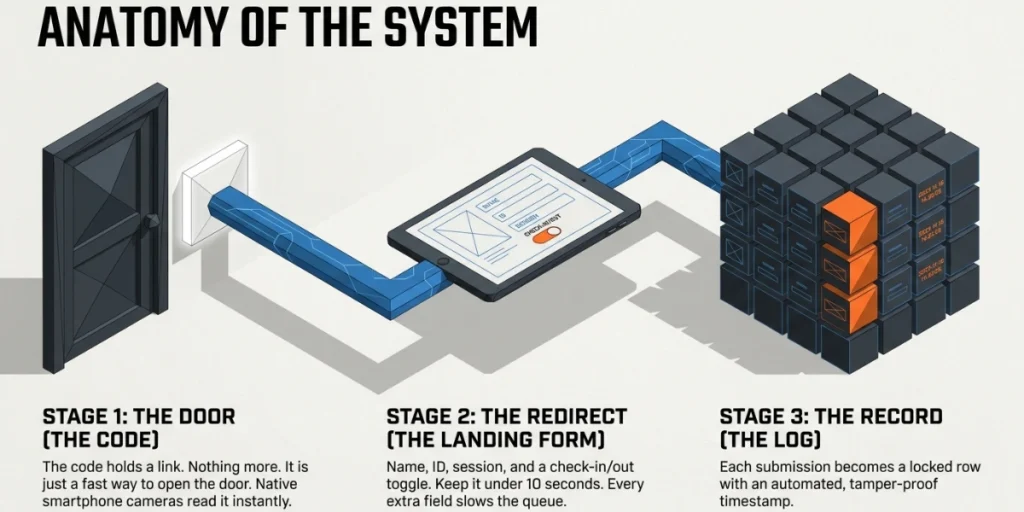
The whole thing has three moving parts.
- The code. A QR Code holds a link. Nothing more.
- The landing form. The link opens a short form. Name, ID, session, and check-in or check-out.
- The log. Each submission becomes a row with a timestamp.
That is it. No app to install. Every modern phone camera reads QR Codes natively.
One thing to be clear about. The QR Code does not record attendance. The form does. The code is just a fast way to open the form. So most of your effort should go into the form and the log, not the square.
Step 0: Pick your setup before you build anything
This is the step most guides skip, and it decides everything after it.
|
|
One shared QR Code |
A unique QR Code per person |
|
How it works |
One code at the door. Everyone scans it and types their name. |
Each person gets their own code on a badge or card. |
|
Setup time |
Ten minutes |
An hour or more |
|
Best for |
Classes, meetings, workshops, small events |
Payroll, safety training, paid conferences, gyms |
|
Speed per person |
Slower. They type. |
Faster. One scan, no typing. |
|
Cheat risk |
High. A photo of the code works from anywhere. |
Low, if your staff does the scanning. |
|
Data quality |
Typos in names and IDs |
Clean and matched to a roster |
My rule is simple. If the record only informs you, use one shared code. If the record pays someone, proves compliance, or gates access, give every person their own code.
B. How to create a QR Code for attendance?
I use Scanova for this because the form, the QR Code, and the scan data sit in one account, and I can edit any of them after the posters are on the wall.
Google Forms plus a separate QR Code generator works too, but the step order is different. In Scanova, a form has no public link of its own.
It starts collecting data only after you attach it to a QR Code, and that attachment is configured by the QR Code, not by the form builder.
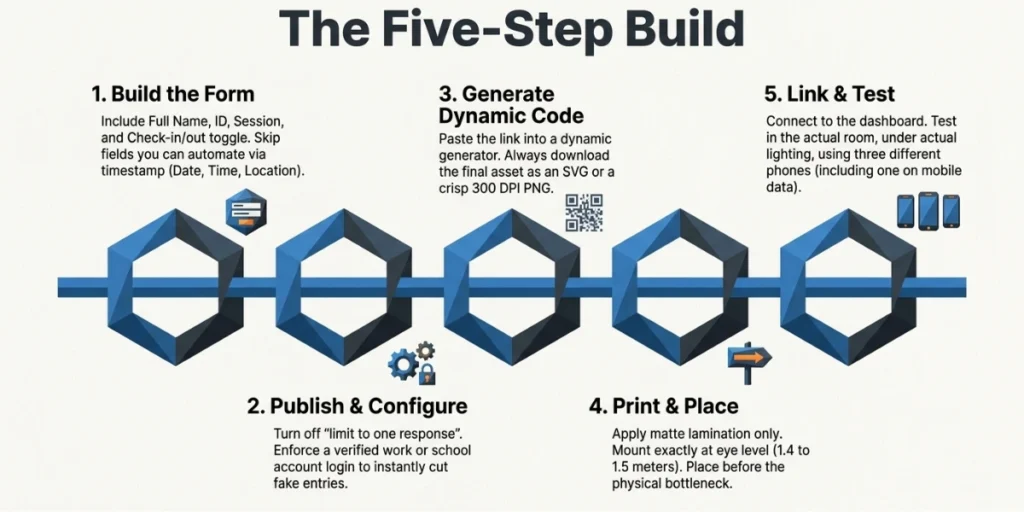
Step 1: Build the attendance form
Open Forms in the left sidebar and click New Form. You get six starting points: Blank form, Contact form, Feedback survey, Customer satisfaction, Event registration, and Lead capture. Event registration is the closest fit for attendance.
Keep it short. Every extra field slows the queue.
Fields I always include:
- Full name (Short Answer)
- Employee or student ID (Short Answer, or Number if your IDs are numeric)
- Session, class, or shift (Dropdown)
- Check-in or check-out (Multiple Choice with two options)
There are 16 question types. The ones worth knowing for attendance are Signature for anything that has to be countersigned, File Upload for a visitor ID photo, and Linear Scale if you are also collecting a quick rating on the way out.
Skip anything you can already work out. Date and time come from the submission timestamp, not from a person. Location comes from the code, not a dropdown.
Two settings decide whether this works at a door. In the right panel under Submit, set a receiver email so entries notify someone in real time, and set the after-submission behaviour to a confirmation message people can show at the desk.
And do not add the Skip Button block. Skip is a canvas block, not a settings toggle, so simply leaving it off the canvas is what makes the form compulsory.
Changes auto-save as you edit. The header button reads “Create Form” on the first save and “Update Form” thereafter.
Step 2: Create the QR Code and pick dynamic before you commit
There is no publish step and no link to copy. You create the QR Code first, then attach the form to it in Step 3.
Go to QR Codes, then Create QR Code. Three starting points:
- Quick Code. A direct action with no landing page. Under 30 seconds.
- Build a Page. A block-based landing page builder. Two to five minutes.
- AI Studio. Describe the page and let it draft one. About a minute, on higher plans.
For attendance, I use Build a Page and start from an Event template or a blank canvas. The page gives the form something to sit on and provides space for a room name, a line of instructions, and your logo.
Choose Dynamic, not Static. This is the one decision you cannot undo. Type is locked at creation, so static code can never be converted to dynamic code later. Dynamic also needs a short URL slug before it can be published. The default is a scnv.io slug you can customize, or your own verified custom domain.
Worth knowing: Website URL is the only Quick Code type that offers both dynamic and static. Phone Call, Email, Text Message, Wi-Fi, Plain Text, Event Calendar and Contact Card are static only, so none of them can be edited or tracked after printing.
Step 3: Attach the form and set the gate
Open the QR Code and go to its Settings tab. Under Tracking & Analytics, turn on Capture Leads, choose Capture using Forms, then click Link Form. Ignore Use Existing Lead List. It is the deprecated predecessor to Forms.
Three things to set in the Link Form panel:
- Form Display Setting. Choose Page Takeover so the form replaces the whole page and nobody scrolls past it. Modal Popup and Slide-in Panel are the alternatives, and both are easier to dismiss.
- Display Timing. Choose Show Immediately. Time Delay is for marketing pages, not a door.
- Advanced Settings. Form Expiry Rules stops the form once it hits a lead count or a date and time, which is exactly right for a one-off workshop. User-Based Display Rule controls whether a returning visitor sees the form again, so set it deliberately if the same phone is used for both check-in and check-out. Match QR Code Theme keeps the form styled like the page behind it.
Click Link Form. Capture Leads collapses back and shows the link as Active, and the form’s own Linked QR Codes tab now lists the code.
One form can be linked to several QR Codes. That is how you run a single attendance form across three doors and still tell the doors apart in the data.
Step 4: Design it, export it, and print it properly
Design is not a step you pass through while creating the code. Create the code first, then open it and click Edit Design.
Three settings matter for anything printed and mounted:
- Error correction. M is the default and is fine for a clean printed code. Move to Q if you are placing a logo in the center, and H if the logo is large. Higher levels cost data capacity, so do not reach for H by reflex.
- Contrast. Dark code on a light background. Never light in the dark. Keep a solid background color rather than transparent for anything going to print.
- Padding. Leave the quiet zone alone. That white margin is not decoration.
Add a label around the code. Frames support custom text, so put “Scan to check in” above the code and your short URL below it.
Exports are PNG, JPG, SVG, PDF, and EPS, at any size from 10 to 2400 pixels. Use SVG for anything a designer will place. For a poster to be printed at a print shop, use the print-ready PDF option rather than a raster export. It produces a black-only, CMYK-controlled vector file built for offset and laser printing. A blurry PNG stretched to A4 is still the most common reason a code fails.
Then place it well. Placement decides your throughput:
- Eye level. About 1.4 to 1.5 meters from the floor.
- Before the bottleneck, not at it. Put the code where the queue forms, not at the desk.
- One code per entry point. For 500 people, plan at least three entry points.
- Matte lamination. Gloss reflects overhead lights and kills scans.
- Outdoors? Use weatherproof vinyl and keep it out of direct glare.
Also, print the short URL under the code. Some people have a dead battery, a cracked camera, or an old phone. A typed URL and a tablet at the desk cover them.
Step 5: Test the whole path, then watch the data
Test the full path on three different phones. An old Android, a recent iPhone, and one phone on mobile data only. Test in the actual room, in the actual light. A code that scans on your desk can fail under a bright hallway window.
There is no spreadsheet to connect. Open Forms, click the form, and you get three tabs:
- Overview. Total Entries, Completed, Skipped, and Completion Rate, each with a trend, over 7d, 30d, 90d or 1y, plus a responses-over-time chart and a breakdown by source.
- Responses. Every submission, with the timestamp, the answers, and the QR Code it came through. That last column is what separates your three doors. There is a date filter with presets, and Export sits in the side panel from any tab.
- Linked QR Codes. Every code currently using the form, with its short URL and status.
Watch the Skipped count. If you left the Skip Button block off the form, it should stay at zero. Any number there means the block is still on the canvas, and people are walking past your gate.
One last check before the event. Run QR Codes, Health Center. It runs five checks across the entire account: expired schedules, unverified domains, unpublished drafts, missing forms, and codes without scans in 30 days. The missing-forms check is the one that catches an attendance code you forgot to link.
C. How to make a unique QR Code for every person?
This is the part that turns attendance from a poll into a record.
- Build your form with a name field and an ID field.
- Create a pre-filled link for one person. Google Forms calls this “Get pre-filled link.”
- Look at the link. You will see the field values inside it.
- Build a CSV with one row per person and one pre-filled URL.
- Upload the CSV to a bulk QR Code generator and export the whole set.
- Print each code on a badge, card, or sticker.
Now the person scans nothing. Your staff scans them. That single change removes the biggest weakness of QR attendance, because the attendee never controls the code.
Richard Lubicky, founder of RealPeopleSearch, described the same approach in Jotform’s guide: “give each employee a code, personal and nontransferable, and through that code they can register their entries and exits.”
D. Static vs dynamic QR Codes for attendance
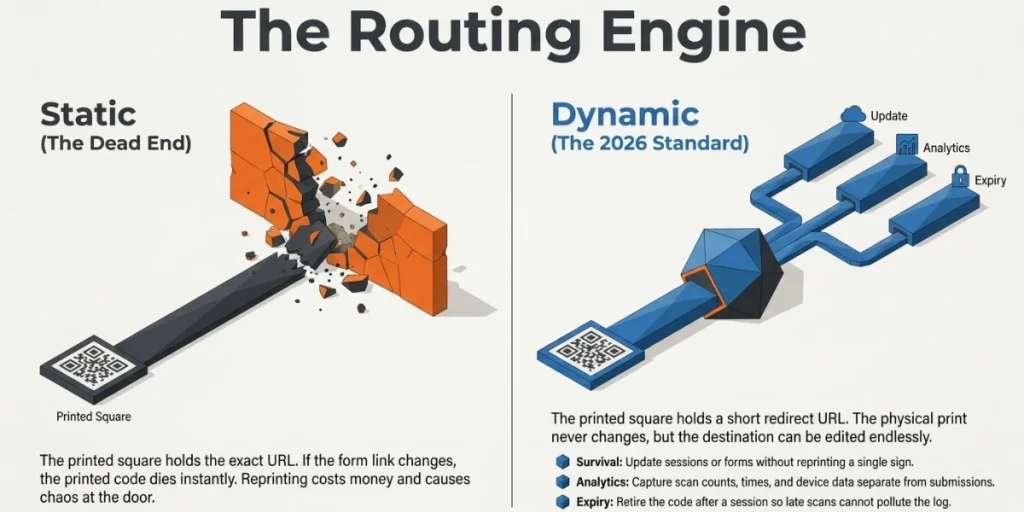
A static code holds the link itself. Change the link, and every printed code is dead.
A dynamic code holds a short redirect URL. The printed square never changes, but you can point it anywhere.
For attendance I always go dynamic. Three reasons:
- You will edit the form. New session, new field, new term. Dynamic codes survive that.
- You get scan data. Scan counts, times, and devices, separate from form submissions.
- You can retire a code. Expire it after a session so late scans do not pollute the log.
If you want the full comparison, I wrote about static vs dynamic QR Codes separately.
E. Stop proxy attendance: six levels of defence
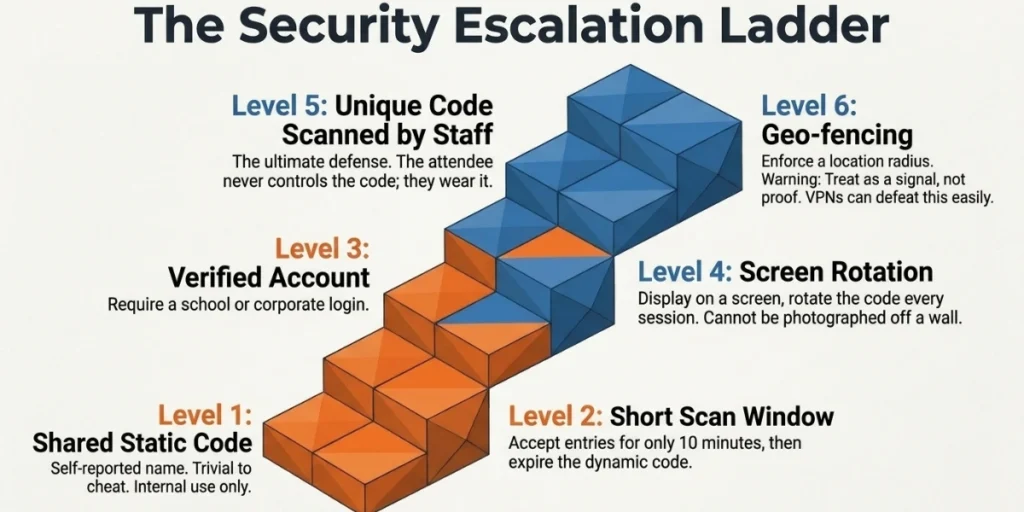
Almost every guide sells you a single shared code and stops there. It ignores the obvious attack. Someone photographs the code and sends it to a colleague at home.
Lubicky named this risk too: “if an employee decides to print their code and pass it on to another employee, the latter can register instead of the colleague.”
Here is the ladder I use, weakest to strongest. Pick the lowest level that matches your stakes.
- Shared static code, self-reported name. Trivial to cheat. Fine for an internal meeting.
- A short scan window. Accept entries for ten minutes only, then expire the code. Cuts casual cheating.
- A verified account. Require a school or work login. Now a name has an identity behind it.
- A per-session code you display on screen. Never printed, so it cannot be photographed off a wall. Rotate it each session.
- A unique code per person, scanned by staff. The attendee cannot self-scan. This is the big one.
- A location check. Some platforms let you geo-fence a code so it only works inside a radius.
Be honest about level 6. Browser location is accurate to a few meters outdoors with GPS, and to hundreds of meters indoors on Wi-Fi or IP. A VPN defeats it. Treat location as a signal, not proof.
And skip biometrics unless you have real legal advice. Under GDPR Article 9, biometric data used to identify a person is a special category, and its processing is prohibited by default.
In Illinois, BIPA requires written notice and a signed release, with liquidated damages of $1,000 for negligent violations and $5,000 for reckless ones. A QR Code avoids that entire category of risk.
F. The print spec nobody publishes
I have seen more attendance systems fail on print quality than on software. QR Codes follow a real standard, ISO/IEC 18004:2024, which covers dimensions and error correction rules. Here is what that means at the door.
Error correction. QR Codes carry redundant data so a scuffed code still reads. GS1 lists four levels of recovery capacity: L is 7%, M is 15%, Q is 25%, and H is 30%. Higher levels make the code denser. For a laminated code in a busy doorway, M or Q is the sweet spot. I explain the trade-off in more detail in my QR Code error correction guide.
Size. Use the 10 to 1 rule. Scan distance divided by ten gives you minimum code width. A code read from 1 metre needs to be at least 10 cm wide. From 3 metres, 30 cm. See my minimum QR Code size guide for the full table.
Quiet zone. Leave clear white space of four modules on all sides. Do not let a border or a logo crowd it.
Logo overlays. A logo eats into your error correction budget. Keep it small and always test the printed version, not the screen version.
Surfaces. Avoid curves, ridges, and anything reflective. A code on a rolled banner edge will not scan reliably.
G. Keep the code itself secure
A wall-mounted attendance code is a soft target. The FTC has warned that “there are reports of scammers covering up QR Codes on parking meters with a QR Code of their own.” The FBI’s IC3 has issued similar alerts about malicious codes harvesting personal data.
Your attendance form collects names and employee IDs. That is worth stealing.
Four cheap defences:
- Print your real domain under the code so people can check it.
- Use tamper-evident labels or a sealed frame.
- Walk the entry points once a week and look for stickers.
- Tell your team to read the URL before typing anything.
H. Privacy and compliance, in plain terms
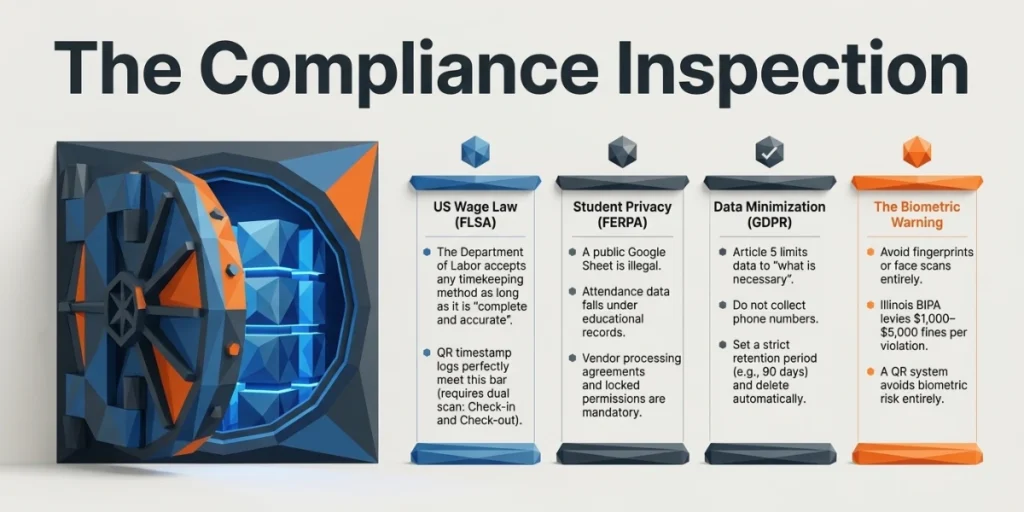
Attendance data is personal data. Treat it that way.
Collect less. GDPR Article 5 says personal data must be “adequate, relevant and limited to what is necessary.” A phone number is not necessary to prove someone attended a meeting.
Set a retention period. The same article says data should be kept no longer than necessary. Decide the number now. Ninety days, a term, or a payroll cycle.
Students in the US. Under federal rules, attendance includes presence “in person or by paper correspondence, videoconference, satellite, Internet, or other electronic information and telecommunications technologies.” Student records held by a school are covered by FERPA, so a public Google Sheet is not acceptable. Lock the sharing settings.
US employees. This is the part I love. The Department of Labor’s FLSA recordkeeping fact sheet says the law “requires no particular form for the records,” and that “employers may use any timekeeping method they choose.” It adds: “Any timekeeping plan is acceptable as long as it is complete and accurate.”
So a QR Code time log is perfectly valid for US wage records. Complete and accurate is the bar. That means every day and every workweek, with no gaps.
Ask your vendor two questions. Where is the data stored, and will you sign a data processing agreement?
I. Check-in, check-out, and the maths in between
If you need hours worked, one scan is not enough. You need two.
Two ways to do it:
- Two codes. One labelled “Check in”, one labelled “Check out”. Place them apart so nobody scans both by accident.
- One code, one toggle. The form asks which one. Fewer prints, slightly more taps.
Then handle the messy cases, because they will happen.
- Unmatched scans. Someone checks in and never out. Flag those rows rather than deleting them.
- Auto close. Set a rule that closes open shifts at a fixed hour.
- Duplicates. Dedupe by ID plus date plus type before you calculate anything.
- Rounding. Agree your grace period in advance and write it down.
For multi-session conferences, place a code at each room door. Then you get session-level attendance, which is what your sponsors actually want.
J. When the internet drops
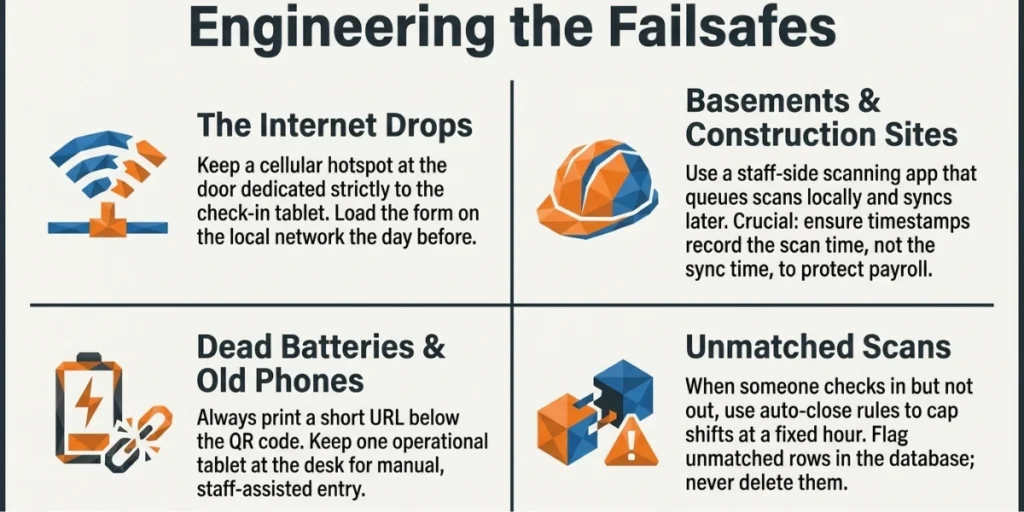
The scan is offline. The form submission is not. That trips people up.
What I do:
- Load and test the form on the venue’s network the day before.
- Keep a hotspot at the door for the check-in tablet.
- Print a paper roster as a fallback, and reconcile it the same day.
- For construction sites and basements, use a staff-side scanning app that queues scans locally.
One warning about queued scans. If they sync hours later, check whether the timestamp records the scan time or the sync time. Those are very different numbers on a payroll report.
K. What it costs?
There are two honest routes.
Free route. Google Forms or Microsoft Forms, plus a free QR generator. Cost is zero. You get no scan analytics, no per-person codes, no editable destination, and no expiry. Good for a class or a one-off meeting.
Paid route. A dynamic QR platform runs from a few dollars a month up to enterprise plans. You are paying for editable codes, bulk generation, analytics, gating, and exports. You can compare Scanova’s plans or any competitor’s.
Do not forget the hidden costs. Printing and laminating. Reprinting when a static code’s destination changes. Staff time at the door. And the cost of fixing bad records later, which the EY data puts at $291 per payroll error.
L. Where this works best?
- Schools and universities. One code per classroom door. Cuts roll call to nothing. Brown University’s Matthew Kraft told Education Week there is “a huge gap between legislating the amount of time the kids should be in school and the actual amount of instruction that students get.” Every minute you claw back counts.
- Offices and shift work. Unique badge codes plus check-in and check-out. Export straight to payroll.
- Events and conferences. Pre-registration codes emailed in advance, then room-level codes inside.
- Safety inductions and toolbox talks. This is the strongest case and almost nobody writes about it. You need a dated, signed record that a specific worker attended a specific briefing. Unique codes plus a laminated site poster do it.
- Gyms, clubs, and places of worship. One shared code is usually enough. Nobody is defrauding a Sunday service.
M. What scan data can and cannot tell you?
Dynamic codes give you scan analytics. Read them carefully.
They can tell you: total scans, scan times, device and OS, and rough city-level location.
They cannot tell you: who scanned, whether they submitted the form, or their exact position.
The gap between scans and submissions is the useful number. If 80 scans produce 60 submissions, twenty people bounced. That usually means a slow form, a bad network, or a confusing first field. Fix the form, not the code.
Sarah Novicoff, a doctoral researcher at Stanford, made a point about classroom interruptions that applies here: “the intercom announcement itself is only 30 seconds long, but the teacher can take much more time than that to get back on track.” A ten second form beats a forty second one by far more than thirty seconds.
FAQs: How to Create a QR Code for Attendance
1. Can I create a QR Code for attendance for free?
Yes. Build a Google Form, then run its link through a free QR generator. You lose analytics, per-person codes, and the ability to edit the destination later.
2. Do people need an app to scan it?
No. iPhone and Android cameras read QR Codes without any app.
3. Can one QR Code track a whole class or shift?
Yes, if people type their name. For clean records, give each person their own code.
4. Can I change where the code points after printing it?
Only with a dynamic code. A static code is fixed forever.
5. Is QR attendance secure enough for payroll?
It can be. Use unique per-person codes, staff-side scanning, and both check-in and check-out. The DOL accepts any timekeeping method that is complete and accurate.
6. How big should the code be?
Divide the scan distance by ten. One meter needs 10 cm. Always test the printed copy.
7. What if someone has no smartphone?
Keep a tablet at the desk and a printed short URL. Manual entry by staff is a valid fallback.
My closing take
The QR Code is the easy part. You can make one in two minutes.
The system is the hard part. Decide shared or unique first. Go dynamic. Print it properly. Set a retention period. Test it on three phones in the real room.
Do those five things and your attendance record will be faster, cleaner, and far easier to defend than the clipboard it replaced.
If you want to build it end to end in one place, you can create your attendance QR Code with Scanova and edit the form, the code, and the report without reprinting a thing.